
Supply and Demand Trading: Zones, Rules and Real Data


Contents
- Supply and demand trading in 30 seconds
- What is supply and demand trading?
- How a zone forms: base and departure
- The four base patterns
- Supply and demand vs order blocks, SMC and support and resistance
- Planning a trade at a zone
- News, gaps and failed zones
- Two real cases: one held, one failed
- What a fixed zone rule did on 25 years of SPY and QQQ
- Which timeframe to use
- Common mistakes with supply and demand zones
- Pros and cons of supply and demand trading
- Conclusion: a useful drawing, not a proven edge
- Frequently asked questions about supply and demand trading
- About the author
A short pause followed by a sharp move leaves a mark that many traders draw as a box and wait for. That box is the core of supply and demand trading. It is simple to explain and hard to pin down, because two traders can draw different boxes from the same chart.
This guide turns the idea into rules you can repeat. You learn how a zone forms, where its edges go, when it first exists, how it differs from an order block and from Smart Money Concepts, and how to plan entry, stop and target. It adds two real SPY cases and a fixed test of 86 trades. This article follows our editorial policy.
Supply and demand trading in 30 seconds
- Idea: mark the short pause (the base) before a sharp move, and plan a trade when price returns to it.
- Demand zone: a base below price that price left upward. Supply zone: a base above price that price left downward.
- Four patterns: rally-base-rally, drop-base-rally, rally-base-drop and drop-base-drop.
- Not the same as an order block: a zone is a broader drawing. Under our two fixed rules on SPY, the two rarely marked the same move.
- Our data: the fixed zone rule lost an average of 0.23R per trade over 86 trades on SPY and QQQ, before costs. Price did not return to 21 of the 110 zones within 30 bars.
What is supply and demand trading?
Supply and demand trading is a chart method that marks the price area a sharp move started from and treats a later return to that area as a possible trade location.
The word comes from economics, but the chart shows less than the word suggests. A sharp rise says that buyers were more aggressive than sellers at that moment. Teachers then add a story: large institutions could not fill their whole order, so unfilled orders still wait in the zone. A price chart cannot show that. Even the most detailed exchange feeds show orders, not who placed them, as our guide to order blocks documents with CME sources. Treat resting orders as a hypothesis, not as an observation.
The zone is a drawing convention, and no single inventor is documented. That supply and demand move prices is an old idea; the Wyckoff method built on it a century ago. The base labels are common in trading education, for example in an article by Sam Seiden that refers to a rally-base-drop supply zone. Different teachers use different rules, so state yours before you judge a result.
How a zone forms: base and departure
A zone needs two parts: a quiet base and a strong departure. Words like “small” and “strong” leave too much room, so we turned them into numbers for our test. They are one reasonable convention, not a law, and they apply to our daily charts.
- Narrow bar: high minus low is at most 0.8 times the average daily range (ATR14, the average true range of the prior 14 bars).
- Base: 2 to 6 narrow bars in a row. A longer quiet phase does not count.
- Departure: the next bar spans at least 1.5 times ATR14 and closes beyond the base, in the direction of its own body.
- Zone: from the lowest low to the highest high of the base.
- First moment it exists: the close of the departure bar. You cannot know earlier that a base was a base.
The near edge and the far edge have different jobs. The near edge is the side price reaches first on its way back, the top of a demand zone or the bottom of a supply zone. Many traders place the limit order there. The far edge marks where the zone is invalid, so the stop goes just beyond it. Some teachers draw from candle bodies or use only the base’s last candle, which gives a narrower box and a tighter stop. Fix one way and keep it.
The four base patterns
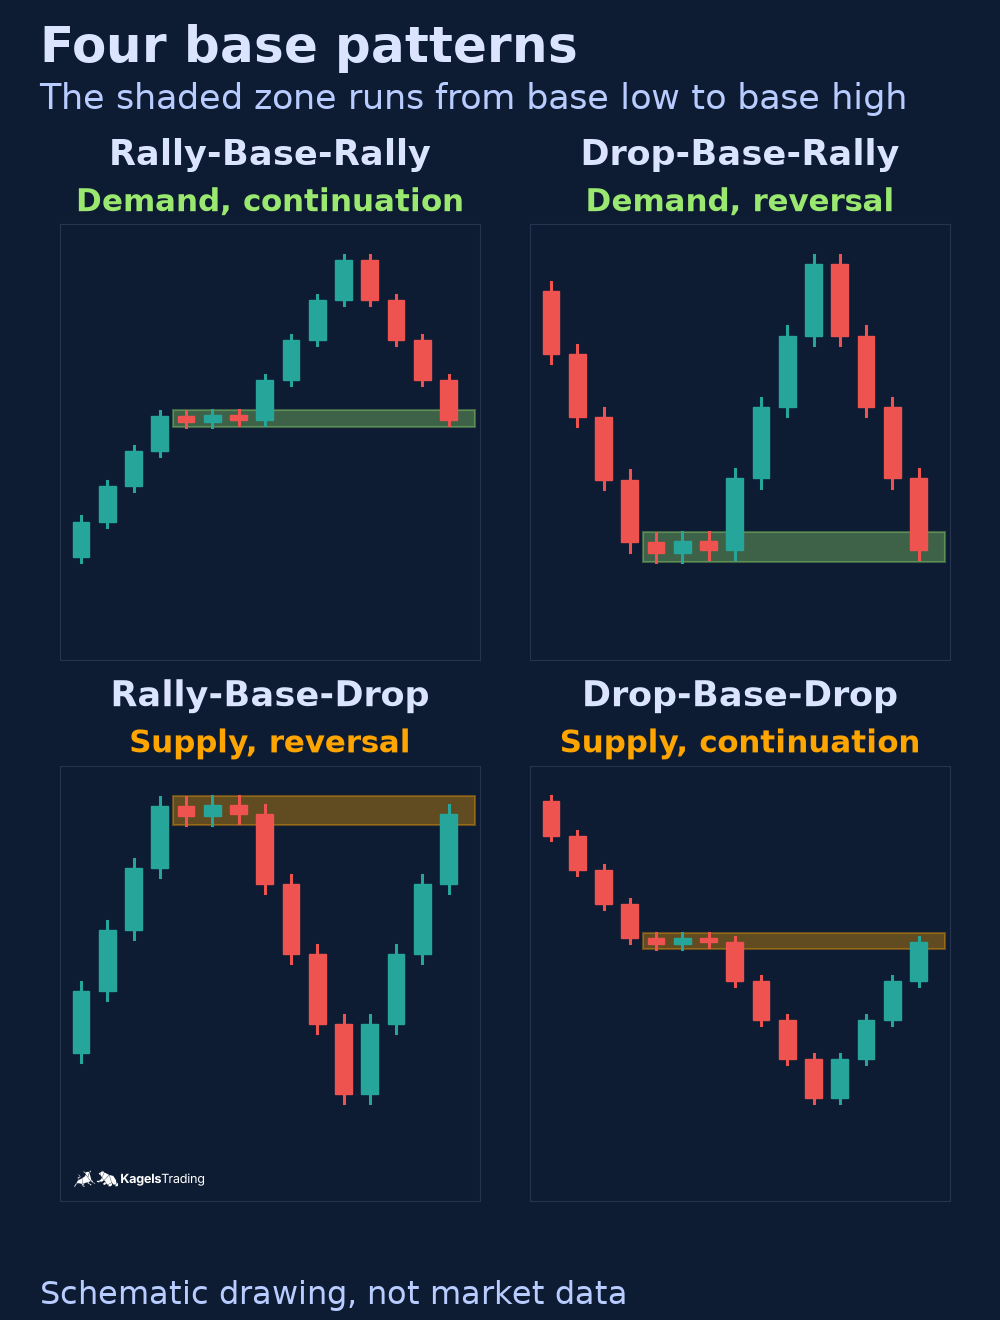
The name follows the move before the base and the move after it. The last word decides the zone: a rally out of the base makes demand, a drop out of the base makes supply. The first word says whether the zone continues the prior move or reverses it.
 Click to enlarge
Source: Kagels Trading, own drawing.
| Pattern | Zone | Prior move | Reading |
|---|---|---|---|
| Rally-base-rally (RBR) | Demand | Up | Continuation |
| Drop-base-rally (DBR) | Demand | Down | Reversal |
| Rally-base-drop (RBD) | Supply | Up | Reversal |
| Drop-base-drop (DBD) | Supply | Down | Continuation |
Even the label depends on a rule. We call the prior move a rally if the close before the base is higher than the close five bars earlier. Our October 2022 example below counts as rally-base-rally by that rule, although the last three bars before the base fell and a trader looking only at them would say drop-base-rally. The pattern name adds little if you cannot say how you measure it.
Supply and demand vs order blocks, SMC and support and resistance
These four terms overlap, and they are not synonyms. They differ in what they mark and in the conditions they require. An order block can sit inside a zone, but a zone does not have to meet the definition of an order block, and seeing both labels on one move is not two independent reasons to trade. The table states how our pages use the terms.
| Concept | What it is | What is marked | Extra conditions |
|---|---|---|---|
| Supply and demand zone | A zone method | The base before a sharp move | None beyond base and departure |
| Order block | One pattern within SMC | The last opposite candle before the move | Often a sweep and a structure break |
| Smart Money Concepts | A teaching framework | Structure, liquidity, order blocks, gaps and more | Depends on the model |
| Support and resistance | Classic level reading | Prior reactions, highs and lows, round numbers | None, more touches are usually read as more relevant |
An order block is narrower in two ways: the box and the conditions. Our guide to Smart Money Concepts treats the order block as one of seven building blocks and notes that it is close to the classic demand or supply zone. Close does not mean equal. The fixed order block rule needs a sweep and a close beyond the last swing, while our zone rule needs neither. The even narrower fair value gap marks only the gap inside the move, not the pause before it.
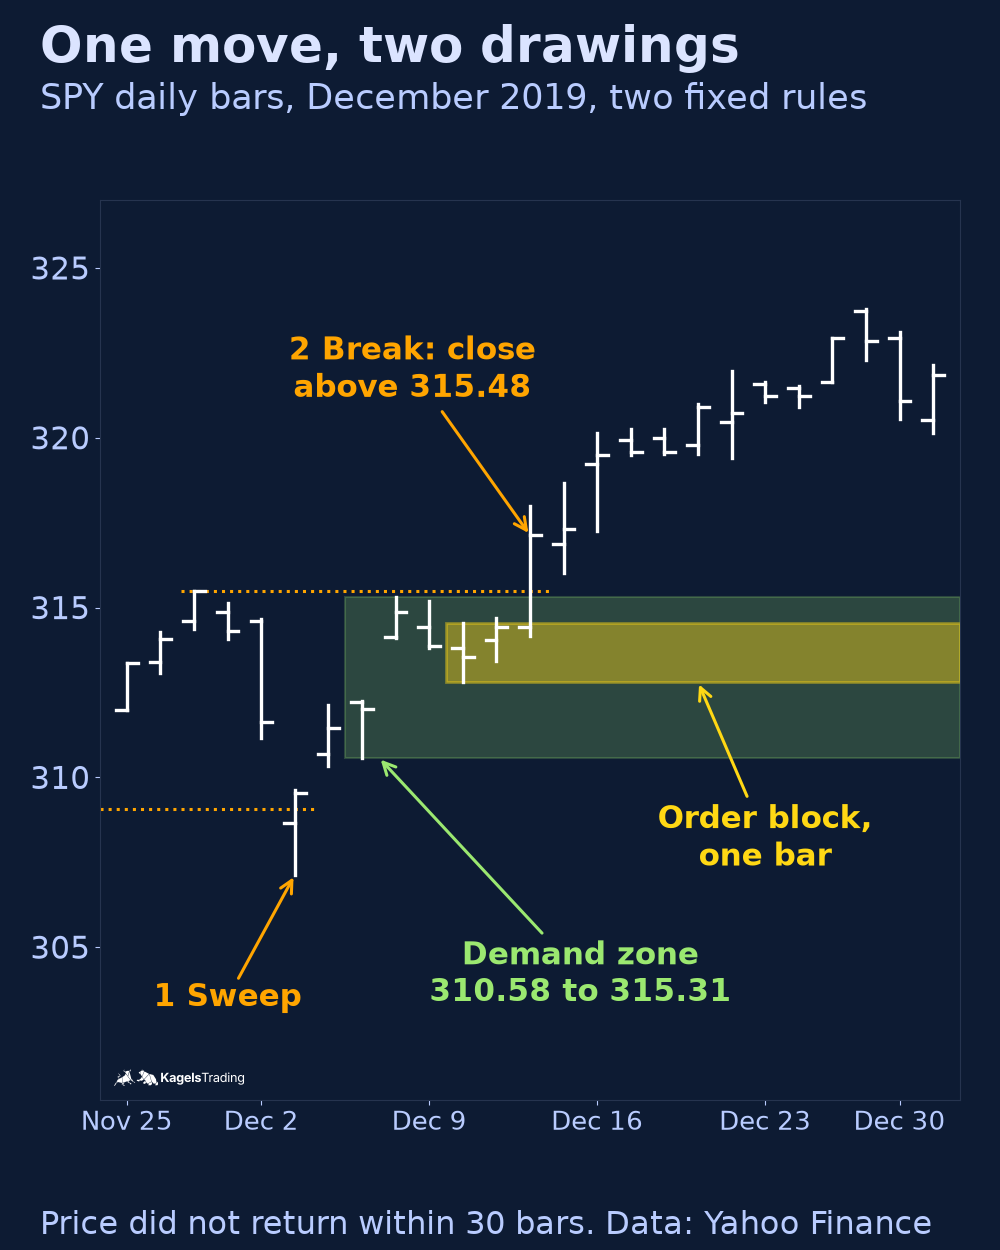
One move in December 2019 shows both drawings at once. On December 3, SPY swept below an old low, and on December 12 it closed above the old high. Our zone rule marks the five-bar base from 310.58 to 315.31. The order block rule marks a single bar inside it, 312.81 to 314.55. The zone is more than twice as wide, so a stop beyond it would be farther away. Price did not come back to either box within 30 bars, which is its own lesson.
 Click to enlarge
Under fixed rules, the overlap was small. We compared our 23 SPY demand zones with the 86 setups of the order block test on the same daily bars. Only one shared its break day with a zone, the example above, and only two order block bars fell inside a base. Hand-drawn charts can look more similar, because a trader tends to draw what is already there. That is a statement about these two rules on one ETF, not about every definition.
Support and resistance comes from a different starting point. It looks at where price has already reacted, often several times. A supply and demand zone looks at the base one move left, and our rule needs no earlier reaction at all. The two can coincide, and then a level is not suddenly stronger because it has two names. Our guide to support and resistance covers that side, including what research on published levels found.
Planning a trade at a zone
A zone gives you a location, not a decision. Entry, invalidation, stop and target still have to be set in advance. Nothing guarantees that an order will fill or that price will return, so plan for both cases and size the position from the stop distance.
- Entry: a limit at the near edge is the simplest. Others wait for a reaction inside the zone, which avoids some losers but also misses trades and gives a worse price. We did not compare the two.
- Invalidation: a close or trade beyond the far edge means the zone failed. Remove it from the chart.
- Stop: just beyond the far edge. Our test uses one cent. The stop distance sets your size, as our guide to position sizing explains.
- Target: a fixed multiple of the risk, or the next opposite zone or swing. Our test uses twice the risk (2R).
- Expiry: decide how long a zone stays valid. Our test drops it after 30 bars without a test.
Two common variations are conventions we did not test. In a sideways market, some traders buy at demand and sell at supply, with the opposite zone as the target, which only works until the range breaks. Others trade the break of a zone and wait for a retest from the other side, the same role reversal known from breakout trading. Neither is covered by our numbers.
News, gaps and failed zones
A zone is a price area, and news does not respect it. Price can open beyond an order, which fills it worse than planned or skips it, and it can run through a stop. In our test, 10 of the 64 stops filled worse than the plan because SPY or QQQ opened beyond them, the worst at −1.43R, and one zone was skipped because the open lay beyond the stop. So the planned risk is not a maximum.
A departure caused by news says little about any waiting order. Our failed example below started with SPY’s fall on the day of the Fed’s December 2024 rate decision. The statement gives the date, not the reason for the move, but on such a day a large fall may reflect a repricing of the whole market, and the pause before it may be just the wait for the event. The bar was almost six times the average range, and the zone still failed on its first test.
Two real cases: one held, one failed
Both cases follow the fixed rule in the next section. We took the last SPY trade in the test that reached its target and the last that hit its stop, so they were not chosen by eye. They are hypothetical, not live trades, and two cases prove nothing about the next one.
A demand zone that held: SPY in October 2022
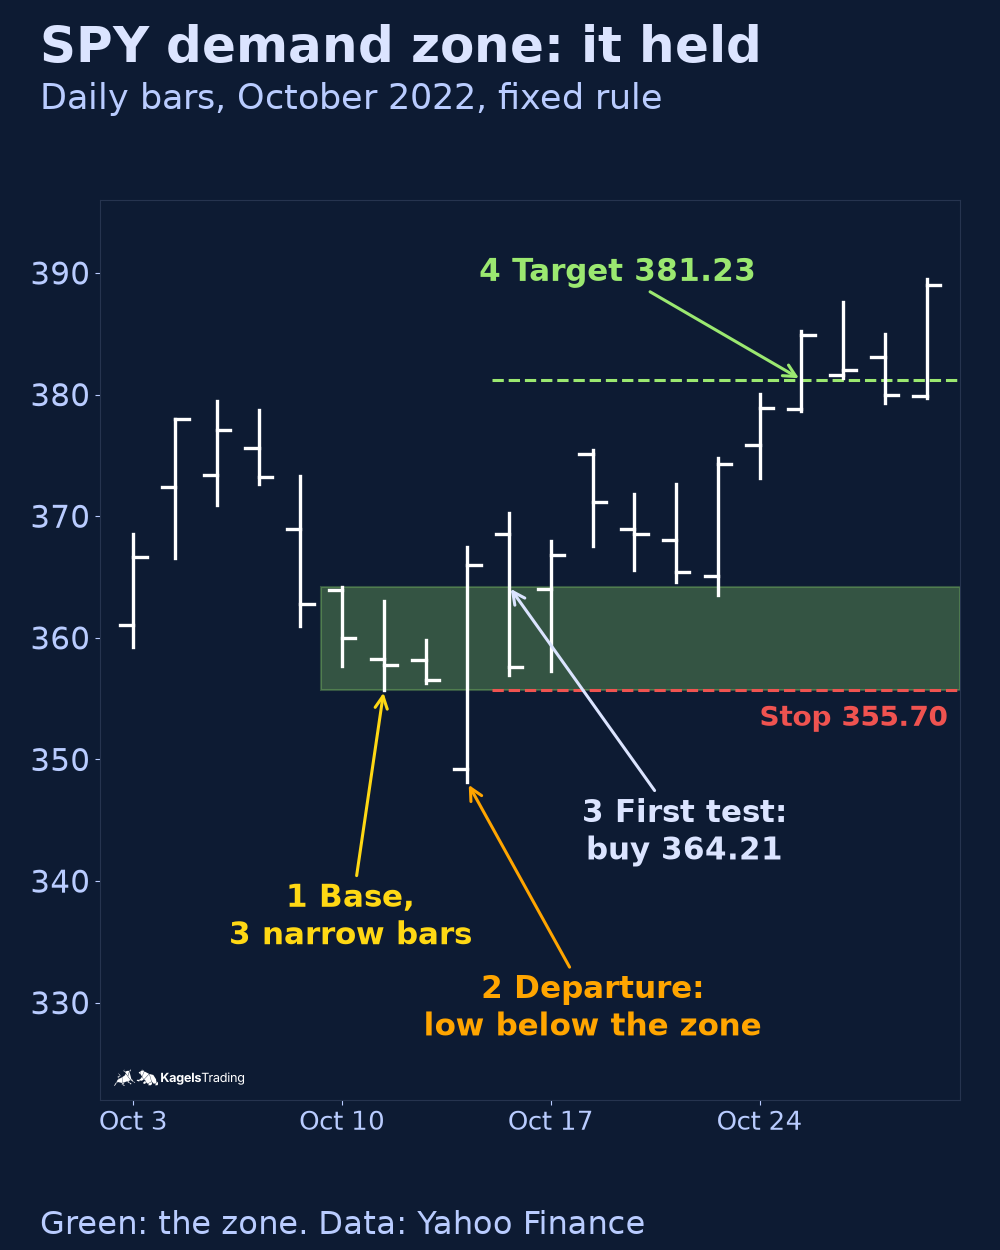
- Base: three narrow bars from October 10 to 12, from 355.71 to 364.21.
- Departure: on October 13, SPY opened below the zone at 349.21, fell to 348.11 and closed at 365.97, above the zone. The first close beyond the base made the zone known.
- First test: on October 14, SPY opened above the zone and traded into it. The limit bought at 364.21, with a stop at 355.70 and a target at 381.23.
- Result: the low that day was 356.96, only 1.26 above the stop. The target was reached on October 25.
 Click to enlarge
The win was closer than the result suggests, and the zone was not clean. The rule allowed a departure bar that began below the zone, so buyers on October 13 first traded far under the box. A stop about $1.30 tighter would have ended the trade on day one. That is how fine the line between a held zone and a failed zone can be on a single bar. A trader drawing by hand might not have marked this base at all.
A supply zone that failed: SPY in January 2025
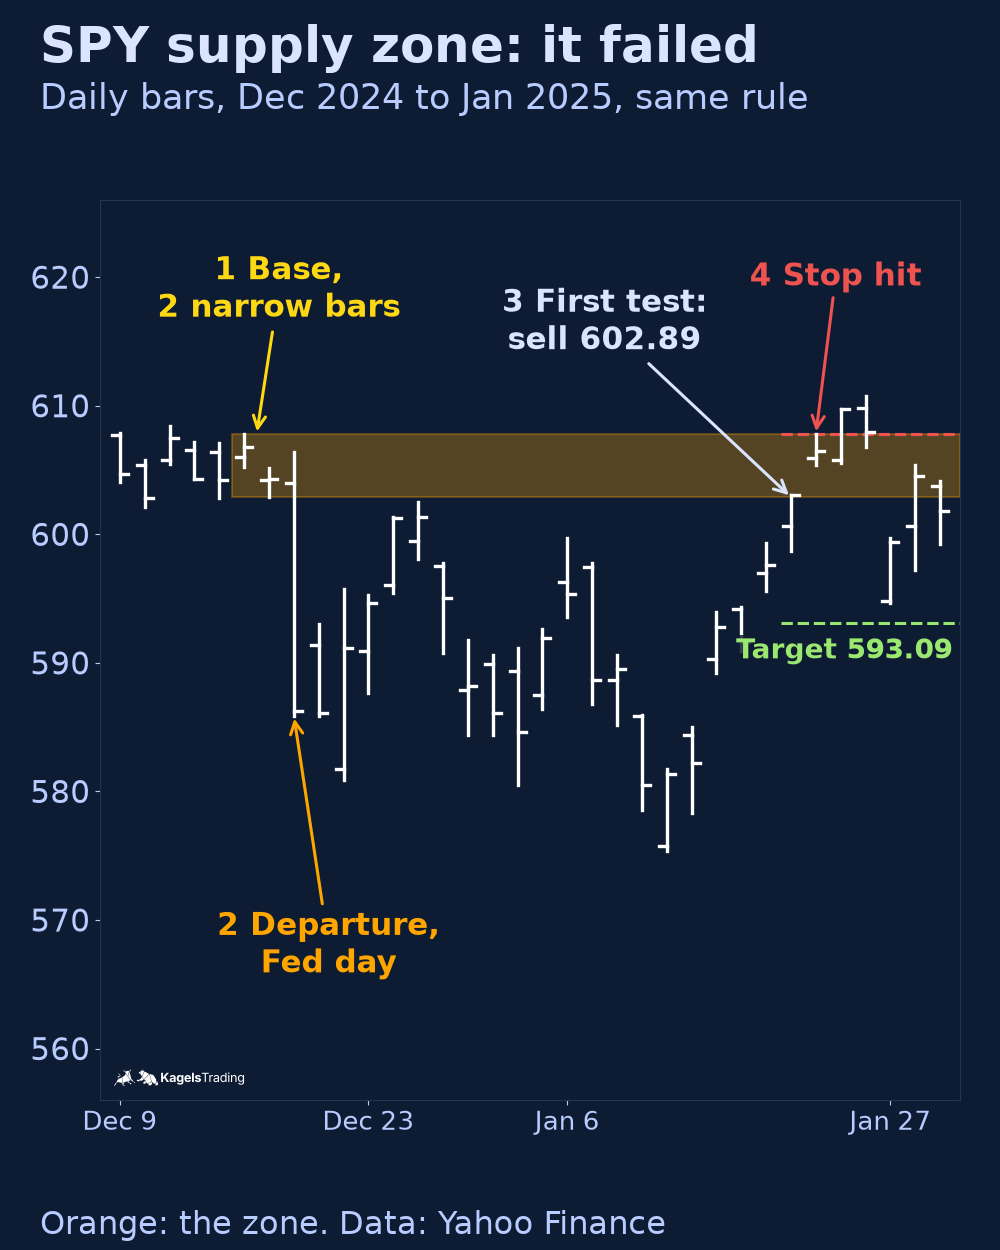
- Base: two narrow bars on December 16 and 17, 2024, from 602.89 to 607.78.
- Departure: on December 18, SPY fell to 585.89 and closed at 586.28. The bar spanned almost six times the average range.
- First test: on January 21, 2025, a month later, SPY rose back to the zone. The limit sold at 602.89, with a stop at 607.79 and a target at 593.09.
- Result: on January 22, SPY opened at 605.92 and reached 607.82, three cents beyond the stop.
 Click to enlarge
On paper this was close to an ideal zone. It was fresh, the departure was very strong, and price needed a month to come back. It still failed at the first touch. On January 23, SPY traded up to 609.75, above the whole zone. Freshness and impulse describe a zone; they do not guarantee a reaction.
What a fixed zone rule did on 25 years of SPY and QQQ
To see the method without hand-picked charts, we applied one rule to all bars. We used SPY and QQQ daily bars from January 2, 2001, to October 16, 2026, from Yahoo Finance, split-adjusted but not dividend-adjusted. The zone rule is the one above. We wrote the rules down before the first run. The execution matches the test in our order block guide, and the trade list has all 86 trades.
- Entry: a limit at the near edge on the first bar that trades into the zone, at most 30 bars after the departure. If that bar opens beyond the near edge, the fill is at the open. If it opens beyond the stop, there is no trade.
- Exit: stop one cent beyond the far edge, target at 2R, or the close of the 40th bar, counting the entry bar. An open beyond stop or target exits at that open. Stop and target in one bar count as the stop. On a bar that fills intraday, a touched target does not count.
- Costs: none in the table. With an assumed 0.05% of the price per round trip, the average falls to −0.28R.
- Comparison: every day from 2002, entry at the open, same side, the median stop size in ATR terms of that group, same target and exits. This is an unconditional reference for the same bracket, not a matched estimate of what a zone adds: zone entries are limit fills, the comparison enters at each open, its stop size was set afterward from the trades, and its trades overlap heavily.
| Result | Zones |
|---|---|
| Zones found | 110 |
| No test within 30 bars | 21 |
| Opened beyond the stop, no trade | 1 |
| Too late for the 40-bar window | 2 |
| Trades | 86 |
| Group | Trades | Target / stop | Average per trade | Comparison days |
|---|---|---|---|---|
| Demand, SPY | 17 | 8 / 9 | +0.47R | +0.09R |
| Demand, QQQ | 16 | 3 / 13 | −0.46R | +0.08R |
| Supply, SPY | 28 | 7 / 21 | −0.26R | −0.11R |
| Supply, QQQ | 25 | 4 / 21 | −0.54R | −0.11R |
| All | 86 | 22 / 64 | −0.23R |
The rule as a whole lost money, and the margin of error is wide. R is the planned risk, so −0.23R means an average loss of about a quarter of the risk. Because trades cluster in time, we resampled calendar years to get a 95% range of −0.53R to +0.07R for all trades. A target at 2R needs about one winner in three to break even, and this rule had one in four. A rising market helped longs and hurt shorts on ordinary days too, which the comparison column shows.
The one positive group is not a finding. SPY demand made +0.47R over 17 trades, with a range from −0.22R to +1.37R. The closely related QQQ made −0.46R over 16 trades under the same rule. Two related ETFs pointing in opposite directions tell you the sample is too small, not that one of them works. All trades ended at a stop or target, none reached the 40-bar limit, and the rule is rare on daily bars: the last trade was in January 2025.
Common advice got mixed support. We fixed these splits before the first run. Each one uses few trades, and the groups overlap, so read them as descriptions, not as filters to adopt.
| Claim | Group A | Group B |
|---|---|---|
| Fresh beats tested | First test: 86 trades, −0.23R | Second test: 44 trades, −0.59R |
| Stronger impulse beats weaker | Above 2.5 ATR: 8 trades, −0.60R | 1.5 to 2.5 ATR: 78 trades, −0.19R |
| With the trend beats against it | With the 200-day average: 30 trades, +0.22R | Against it: 52 trades, −0.49R |
| Continuation vs reversal | RBR and DBD: 37 trades, −0.34R | DBR and RBD: 49 trades, −0.15R |
Read each line with its limit. Second tests did worse, but only zones that survived the first touch can reach one, so the groups are not alike. The strength claim did not hold here, and 8 trades cannot refute it either. The trend line shows the largest gap, but it is no controlled evidence for a filter: the groups have different direction mixes and the subgroups are very small. Longs made +0.03R with the trend (24 trades) and +0.29R against it (7); shorts made +1.00R with it (6) and −0.61R against it (45). Four early trades had no 200-day average yet. First tests themselves lost money, so a fresh zone was no edge in this test.
Changing the two thresholds changes almost everything. After seeing the first result, we added a check that varies the narrow-bar limit (0.7, 0.8, 0.9 ATR) and the departure size (1.25, 1.5, 2.0 ATR). The nine versions gave between 9 and 257 trades. Seven averaged a loss, from −0.07R to −0.28R. The two gains, +0.13R and +0.67R, came from only 35 and 9 trades. That is the method’s subjectivity in numbers: the same idea on the same data yields very different samples.
What this test does not say. It covers two related ETFs, daily bars, a limit at the near edge and one definition of a zone. It says nothing about futures or forex intraday, about entries with confirmation, or about a trader’s judgment. Results are hypothetical, with no live orders behind them. If you trade zones, write your rule down first and check it with our guide to backtesting.
Which timeframe to use
Zones can be drawn on any timeframe, and we only tested daily bars. A common claim is that higher timeframes give stronger zones because of larger participants. We found no measurement to support that, so we do not repeat it as fact. What does change is practical: a daily zone has a wider stop and fewer signals, an intraday zone the reverse, with costs weighing more.
Many traders mark the zone on a higher timeframe and time the entry on a lower one. This can shrink the stop, and it also changes the sample and the fill rate, so it is a different strategy to test, not a free improvement. Our guide to multi-timeframe analysis covers the routine. Whatever you choose, use the same timeframe for the rule and for its test.
Common mistakes with supply and demand zones
Most of these errors come from drawing after the fact. A chart full of boxes always contains one that worked, which feels like confirmation. The list below is experience and convention, not tested rules, except where the data above applies.
- Too many zones: if every pause gets a box, one will always look right. Limit yourself to zones that meet your written rule.
- Drawing with hindsight: a zone exists only from the close of the departure bar. Marking it earlier flatters any backtest.
- Assuming price must return: 21 of 110 zones in our test got no test within 30 bars.
- Counting labels as confirmation: a zone, an order block and a fair value gap from one move are one observation.
- Trusting a good story: resting institutional orders are an explanation, not something the chart shows.
- Skipping the costs: with a stop near 1% of price, 0.05% per round trip costs about 0.05R on every trade.
Pros and cons of supply and demand trading
The method offers clear planning and thin evidence. Weigh both before you add it to your routine and your rules.
Pros:
- Defined risk on paper: the far edge gives a natural place for the stop, before you enter.
- No indicator needed: it uses only highs, lows and closes.
- Works as a plan: a zone forces you to decide location, stop and target in advance.
Cons:
- No edge in our test: the fixed rule lost 0.23R per trade before costs on SPY and QQQ, with a wide margin of error.
- Subjective: small changes to the definition change the sample several times over.
- Unverifiable story: the chart does not show who traded or whether any order is still there.
- Missed trades: limit orders do not fill when price never returns.
Conclusion: a useful drawing, not a proven edge
A supply and demand zone is a repeatable way to mark where a sharp move began. It gives you a location and an invalidation level, and it is broader and looser than an order block. Use the names precisely, and do not count them twice when they mark the same move.
The data does not support trading zones on their own. On daily SPY and QQQ bars, a fixed zone rule did not show a positive result, and neither a strong departure nor a fresh zone rescued it. If you use zones, define them in numbers, test them in your market, and judge the result after costs.
This guide is education, not investment advice. Trading futures, options or leveraged products can lose more money than you expect, and past examples do not predict future results. Decide your risk per trade before you enter.
Frequently asked questions about supply and demand trading
What is supply and demand trading?
It is a chart method that marks the short pause before a sharp move as a zone and plans a trade when price returns. A rally out of the pause makes a demand zone, a drop out of it a supply zone.
How do you draw a supply and demand zone?
Find a sharp move, go back to the pause just before it, and mark the low to the high of those bars. Decide in numbers what counts as a narrow bar and a strong departure. The zone exists only from the close of the departing bar.
What is the difference between a supply and demand zone and an order block?
A zone marks the whole base before a move; an order block marks the last opposite candle, often with a sweep and a structure break required. One can sit inside the other. Under our two fixed rules on SPY, they rarely marked the same move.
What is the difference between supply and demand and support and resistance?
Support and resistance starts from where price has already reacted; a zone starts from the base a sharp move left. The two can coincide, and a shared price is one level, not two signals.
Are fresh zones better than tested zones?
This is widely taught, and our test cannot confirm it as an edge. Second tests did worse than first tests, but only zones that survived can reach a second test, and first tests also lost money. See the table above.
Does supply and demand trading work?
Our fixed daily rule on SPY and QQQ lost 0.23R per trade over 86 trades before costs, with a range that includes zero. That does not rule out every variation. It means a rule needs its own test, in your market and with costs.
Who invented supply and demand trading?
We found no documented single inventor. The economic idea is old, and Richard Wyckoff worked with it about a century ago. The zone labels spread through trading education, and teachers such as Sam Seiden use them, each with their own details.
Which timeframe works best?
No timeframe is proven best, and we only tested daily bars. Higher timeframes give fewer signals and wider stops; lower ones give more signals and higher costs relative to risk.
This English edition is based on our German edition on kagels-trading.de and has been adapted for international readers.
More Chart Techniques guides
- Draw key levels
Support and Resistance: How to Draw and Use Key Levels
Where useful levels come from, how to draw zones with a stated rule and how to turn a level into a trade plan.
- Read price action
Price Action Trading: How to Read Charts Without Indicators
Market structure, key zones and three bar patterns, with a core setup and a real SPY example where the signal failed.
- Read candlestick charts
How to Read Candlestick Charts: Body, Wicks and Context
Open, high, low and close in one candle, body and wicks, two real Gold candles read step by step and how often patterns really occur.
- Know candlestick patterns
Candlestick Patterns: 10 to Know, Tested on Real Data
Ten patterns with rules and a cheat sheet, counted on DAX, S&P 500, EUR/USD and Gold since 2014: most are rare, none is a signal on its own.
- Combine timeframes
Multi-Timeframe Analysis: A Weekly and Daily Workflow
How to combine the weekly chart for context and the daily chart for entry under one stated rule, with a documented SPY case from June 2025.
- Trade pullbacks
Pullback Trading: Entries, Stops and Failed Setups
Pullback or reversal, limit against confirmation entry, and one fixed rule set on three real QQQ cases: a target, a stop and a cancelled setup.
- Trade sideways ranges
Range Trading: Boundaries, Orders and Two Documented Fades
A 14-session rule to draw horizontal boundaries, three order-type variants and two Alpaca-verified SPY fades, one that reached the target and one that was stopped out.
- Read chart formations
Chart Patterns: Reversals, Continuations and Failures
Reversal, continuation and bilateral formations with the measured-move convention per pattern and two documented SPY rectangle cases.
- Trade breakouts
Breakout Trading Strategy: Entries and False Breakouts
How often breakouts fell back into the range in our count of 1,472, and how to plan entry, stop and position size.
- Draw and trade trendlines
Trendline Trading: How to Draw Trendlines and Trade Them
How to draw trendlines with a fixed rule, four strategies for bounces, breaks and retests, and a real SPY line break without a lasting reversal.
- Use Fibonacci levels
Fibonacci Retracement Levels: How to Draw and Trade Them
How to calculate and draw retracement levels, trade pullbacks with confluence and a stop at the structure, and what a ten-year test says about the levels.
- Set Fibonacci targets
Fibonacci Extension: Levels, How to Draw It and Calculator
Three-point extension targets from the end of a pullback, why they differ from levels beyond 100%, a free calculator and three SPY swings, one without a single target reached.
- Trade gaps
Gap Trading Strategy: How to Trade Gaps and When Gaps Fill
Opening and full gaps, the four classic gap types, how often SPY gaps filled in our count since 2001, and plans for gap fill and gap and go.
- Calculate pivot points
Pivot Points: Formulas, Types and How to Trade Them
Formulas for standard, Fibonacci, Woodie, Camarilla and DeMark pivots, a free calculator, which session counts and a real SPY day.
- Swing trade
Swing Trading: 4 Strategies, Risk and Real Examples
Four swing trading strategies on the daily chart, position size, gap risk and US rules, with two hypothetical SPY pullbacks: one hit its target, one was stopped out.
- Identify market stages
Stage Analysis: Stan Weinstein's Four Market Stages
Stan Weinstein's four stages on the weekly chart, a Stage 2 checklist and two TSMC breakouts: one ran for a year, one gapped through its stop.
- Screen for growth leaders
CAN SLIM: William O’Neil’s Seven Rules for Growth Stocks
William O'Neil's seven CAN SLIM criteria with thresholds, his selling rules, a free screen with real counts and what the tests really show.
- Read Wyckoff ranges
Wyckoff Method: Accumulation, Distribution and Springs
Accumulation and distribution with phases A to E, springs and upthrusts as optional tests, and two real TSMC ranges read with and without hindsight.
- Trade Darvas boxes
Darvas Box Strategy: Rules, Entries and Stop Losses
The box rules step by step, when the edges become known, where the stop goes, and a mechanical test on TSMC in 2024 with two honest results.
- Count Elliott waves
Elliott Wave Theory: Rules, Patterns and Fibonacci
The five-wave pattern, three hard rules, zigzags, flats and triangles, Fibonacci ratios and a real DAX count, from the first German translator of the standard work.
- Understand Smart Money Concepts
Smart Money Concepts (SMC): What They Are and What Holds Up
The seven SMC building blocks, BOS vs CHoCH vs MSS, one labeled SPY sequence that held, one that failed, and what a chart can and cannot show.
- Understand ICT trading
ICT Trading: Silver Bullet, Killzones and What Holds Up
Michael Huddleston's Inner Circle Trader method: Silver Bullet, Judas Swing, the 2022 model and killzones in New York time, with one SPY setup that worked and one that failed.
- Trade order blocks
Order Blocks: How to Spot, Draw and Trade the Zone
The three conditions behind a valid order block, entry and stop at the zone, two SPY cases from 2026 and a 25-year count where a fixed rule lost money.
- Trade fair value gaps
Fair Value Gap (FVG): How to Spot, Trade and Test It
The three-candle rule, bullish, bearish and inverse FVG, two SPY cases from 2026 and a 25-year count of how often gaps were revisited and traded.
- Trade inverse fair value gaps
Inverse Fair Value Gap (IFVG): Rules, Examples and a Test
When a broken gap counts as inverted, three entry styles, one SPY retest that held, one that failed, and a 25-year test with trend and sweep filters.
- Trade failed breakouts with Turtle Soup
Turtle Soup Trading: Raschke Rules, ICT Version and a Test
Linda Raschke's original rules, Turtle Soup Plus One and the ICT version side by side, two SPY examples and a 25-year test on SPY and QQQ.
- Read a break of structure
Break of Structure (BOS): Rules, CHoCH vs MSS and a Test
Which swing counts, BOS vs CHoCH vs MSS under one stated convention, two SPY breaks that won and lost, and a 25-year test against ordinary days.
- Read a change of character
Change of Character (CHoCH): Rules, BOS vs MSS and Data
The first close against the trend, close versus wick, CHoCH vs BOS vs MSS, two SPY cases and what the trend did next after 287 CHoCHs on SPY and QQQ.
- Read a market structure shift
Market Structure Shift (MSS): Rules, BOS vs CHoCH and Data
MSS as a CHoCH with a sweep and a fair value gap, the comparison with BOS and CHoCH, two 2021 cases and what 14 daily MSS on SPY and QQQ did next.
- Read liquidity sweeps
Liquidity Sweep: How to Spot It and Trade the Reversal
Sweep or run, buy-side and sell-side liquidity, internal and external targets, SPY reversal, continuation and failed-reversal examples and a 25-year count of a fixed sweep rule.
- Interpret volume
Volume Analysis in Trading: How to Read Volume Honestly
What volume counts in stocks, futures, forex and crypto, how to read it against its own average, and our SPY test of high-volume days since 2001.