
Chart Patterns: Reversals, Continuations and Failures


Contents
- Chart patterns in 30 seconds
- A compact comparison of common patterns
- What a chart pattern is
- Reversal patterns
- Continuation patterns
- How to read a formation in practice
- Two SPY rectangle cases under one illustrative rule
- Checklist and limits
- Frequently asked questions about chart patterns
- Sources we checked for pattern conventions
- About the author
Chart patterns are shapes a market has drawn before, that often appear again, with mixed results. This guide covers multi-swing price formations: head and shoulders, double and triple top/bottom, rounding tops and bottoms, rectangles, triangles, flags and pennants, wedges, cup and handle. Candle-scale patterns live in a separate guide. This article is educational, not personal advice. This article follows our editorial policy.
Chart patterns in 30 seconds
- A chart pattern is a repeating multi-swing shape, drawn by at least a few bars on the chart.
- A pattern is not a prediction. It is a template for a decision: wait for a stated confirmation, then plan the order, the stop and the target before acting.
- The measured move is a projection, not a promise. Each pattern has a stated convention for the distance; the convention does not guarantee that the price gets there.
- Reversal, continuation and bilateral are categories, not laws. Any pattern can fail; a failed reversal does not have to resolve into a continuation and can also drift into further consolidation, and a failed continuation does not have to reverse. The next move is read on the chart, not forced by a label.
- Two documented SPY rectangle cases below show the same rule reaching its target in one window and being invalidated in another.
A compact comparison of common patterns
Scroll the table sideways on a phone to see every column.
| Pattern | Appearance | Prior context | Confirmation (this guide) | Measured move | Common failure after confirmation |
|---|---|---|---|---|---|
| Head and shoulders | Left shoulder, higher head, right shoulder | Uptrend | Daily close below neckline | Head to neckline distance | Daily close back above neckline |
| Inverse head and shoulders | Mirror of head and shoulders | Downtrend | Daily close above neckline | Head to neckline distance | Daily close back below neckline |
| Double top (M) | Two swing highs at a similar level | Uptrend | Daily close below intervening low | Peak-to-trough height | Daily close back above intervening low |
| Double bottom (W) | Two swing lows at a similar level | Downtrend | Daily close above intervening high | Trough-to-peak height | Daily close back below intervening high |
| Triple top/bottom | Three swings at a similar level | Trend | Same as double, after three swings | Same as double | Same as double |
| Rounding bottom | Slow rounded bowl | Downtrend | Daily close above pattern high | Bowl depth | Daily close back below mid-pattern |
| Rounding top | Mirror of rounding bottom | Uptrend | Daily close below pattern low | Bowl depth | Daily close back above mid-pattern |
| Rectangle | Horizontal top and bottom lines | Trend or sideways | Daily close beyond horizontal line | Height of the rectangle | Daily close back inside the rectangle |
| Ascending triangle | Horizontal top line, rising lower line | Uptrend | Daily close above top line | Width at pattern start | Daily close back below top line |
| Descending triangle | Horizontal bottom line, falling upper line | Downtrend | Daily close below bottom line | Width at pattern start | Daily close back above bottom line |
| Symmetrical triangle | Two converging lines | Trend | Daily close beyond near line | Width at pattern start | Daily close back through the broken line |
| Bull flag | Steep up move, shallow downward consolidation | Uptrend | Daily close above upper flag line | Length of flagpole | Daily close below the flag’s lower line |
| Bear flag | Mirror of bull flag | Downtrend | Daily close below lower flag line | Length of flagpole | Daily close above the flag’s upper line |
| Pennant | Flag with converging lines | Trend | Same as flag | Length of flagpole | Daily close against pole direction |
| Rising wedge | Two upward-sloping lines, lower line steeper | Uptrend or downtrend | Daily close below lower line | No standard; use discretion | Daily close back above upper line |
| Falling wedge | Two downward-sloping lines, upper line steeper | Downtrend or uptrend | Daily close above upper line | No standard; use discretion | Daily close back below lower line |
| Cup and handle | Rounded bottom, shallow pullback on the right | Uptrend | Daily close above handle high | Depth of the cup | Daily close back below handle low |
The table is a compact description, not a promise. Volume rules are soft signals, and none of the confirmations above requires them.
What a chart pattern is
A chart pattern is a multi-swing shape with a stated confirmation rule. The shape is drawn by at least three or four price swings; the rule names the condition that turns the shape into a trade decision. Without the rule, a pattern is a drawing.
What this guide does not cover is one-bar and two-bar candle setups. Hammer, engulfing, inside bar, piercing and dark cloud cover live on a different scale: a single candle or a small sequence. The honest count of how often each one really occurs sits in the candlestick patterns guide; the method for reading each candle sits in the how to read candlestick charts guide.
The guide also does not cover indicator crosses. The 50-day and 200-day moving-average crossing is an indicator pattern, not a chart pattern, and belongs with the golden cross and death cross guides, where the counts are run on long price histories.
Reversal patterns
Reversal patterns are shapes that often appear at the end of a trend. The word “often” is doing work: the same shape can appear mid-trend and resolve as a continuation.
Head and shoulders
 Click to enlarge
Source: Kagels Trading, own drawing.
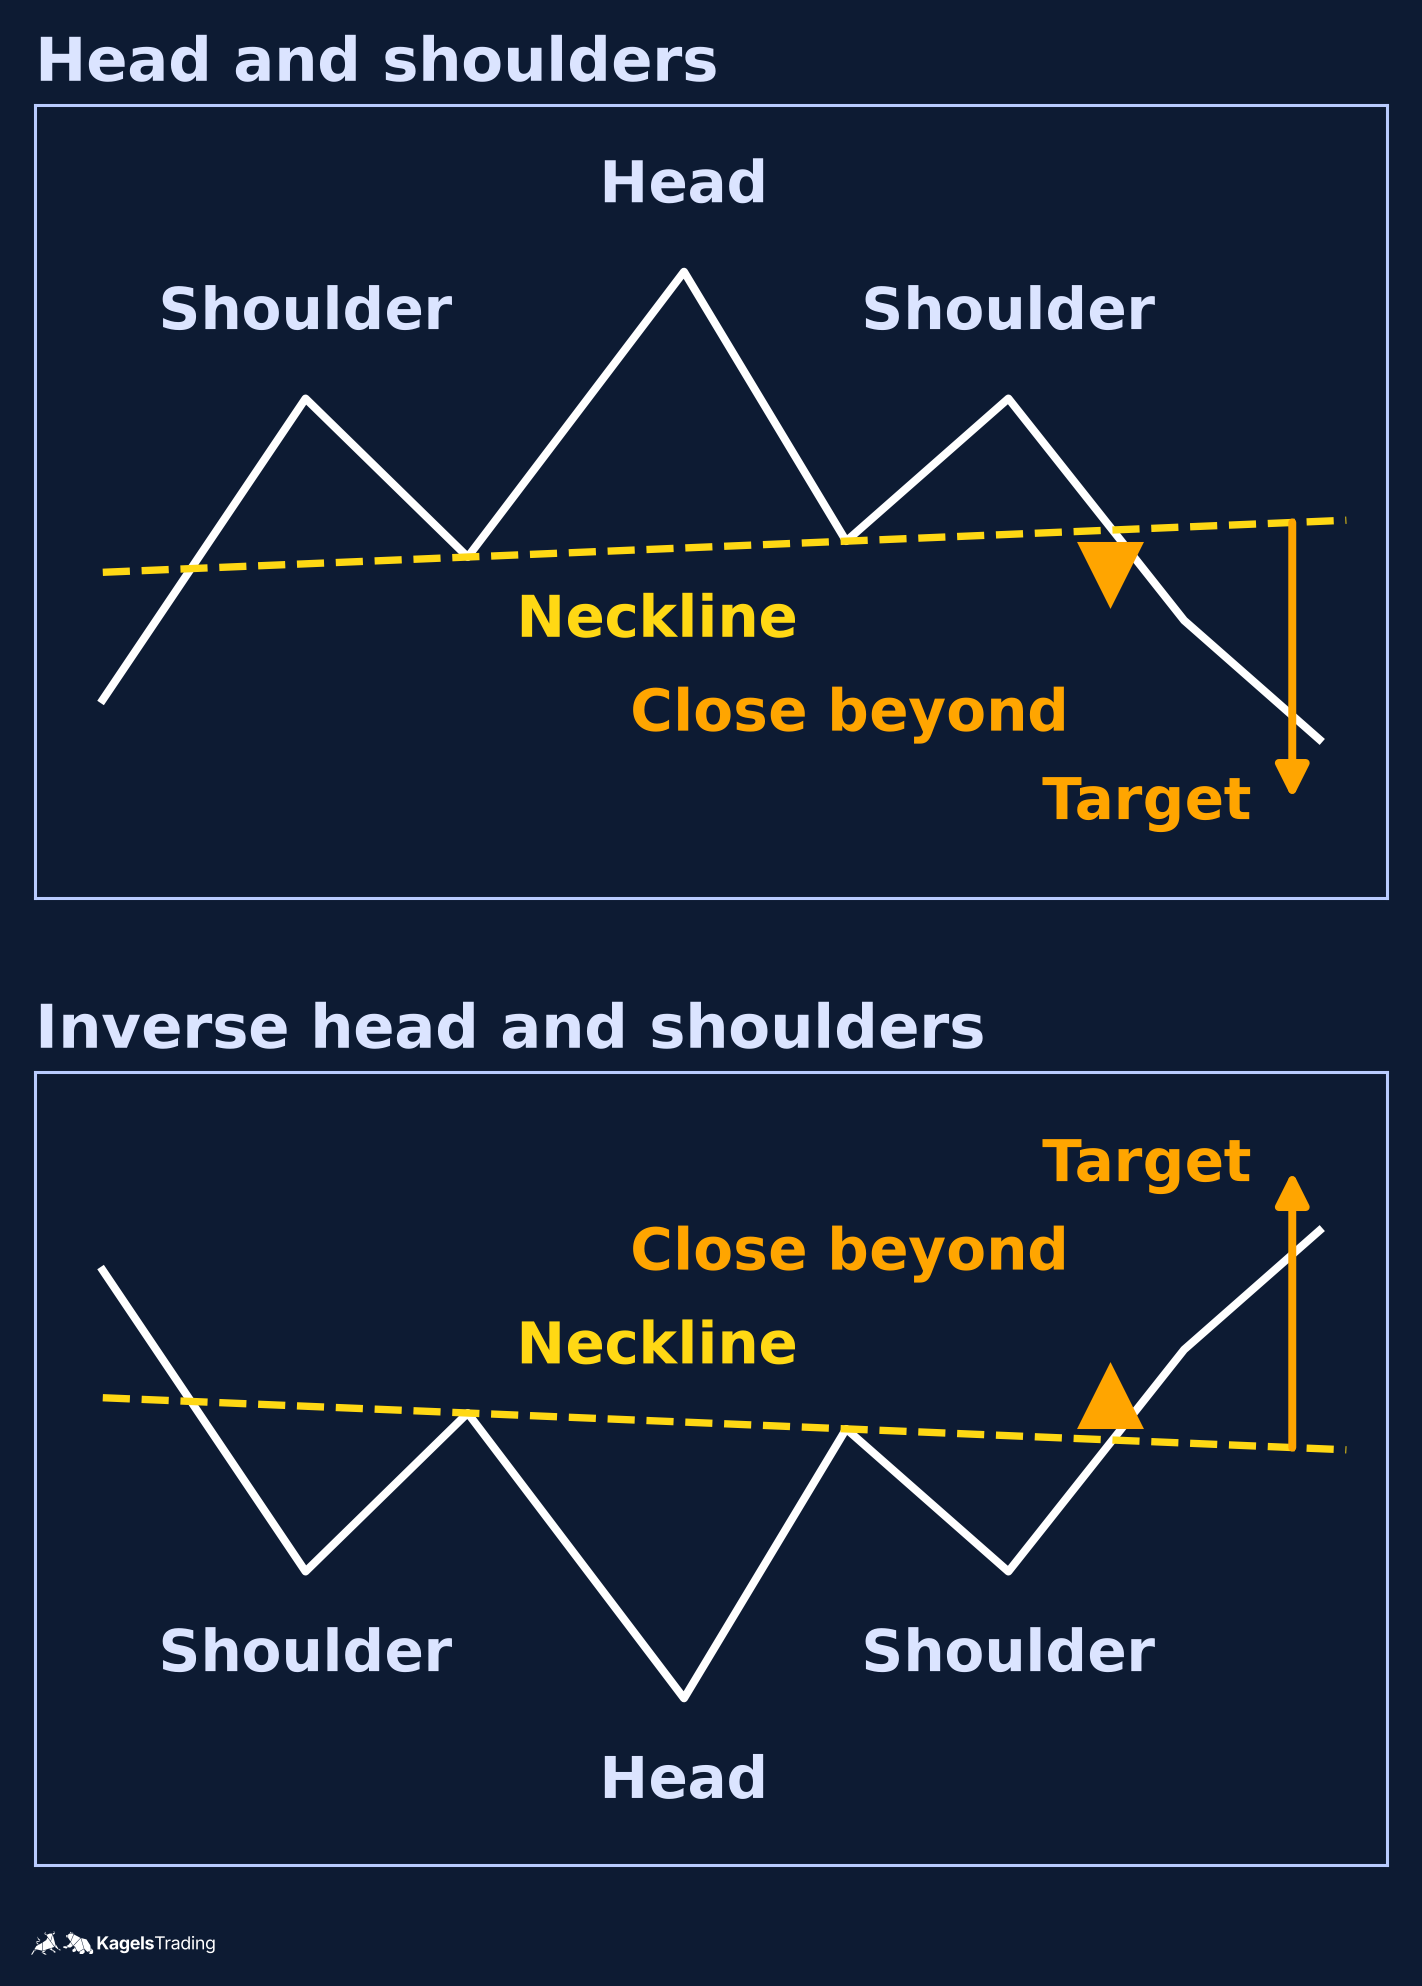
A head and shoulders is a left shoulder, a higher head and a right shoulder, with a neckline connecting the two swing lows between them. The inverse flips the geometry: a left shoulder, a lower head and a right shoulder, with the neckline across the two swing highs. The neckline is often sloped; a horizontal reading is a special case.
- Confirmation on this guide is a daily close beyond the neckline. An intraday pierce that closes back is not confirmation.
- Invalidation after confirmation is a daily close back on the other side of the neckline.
- Measured move: the vertical distance between the head and the neckline, projected from the neckline break.
Double top and double bottom
 Click to enlarge
Source: Kagels Trading, own drawing.
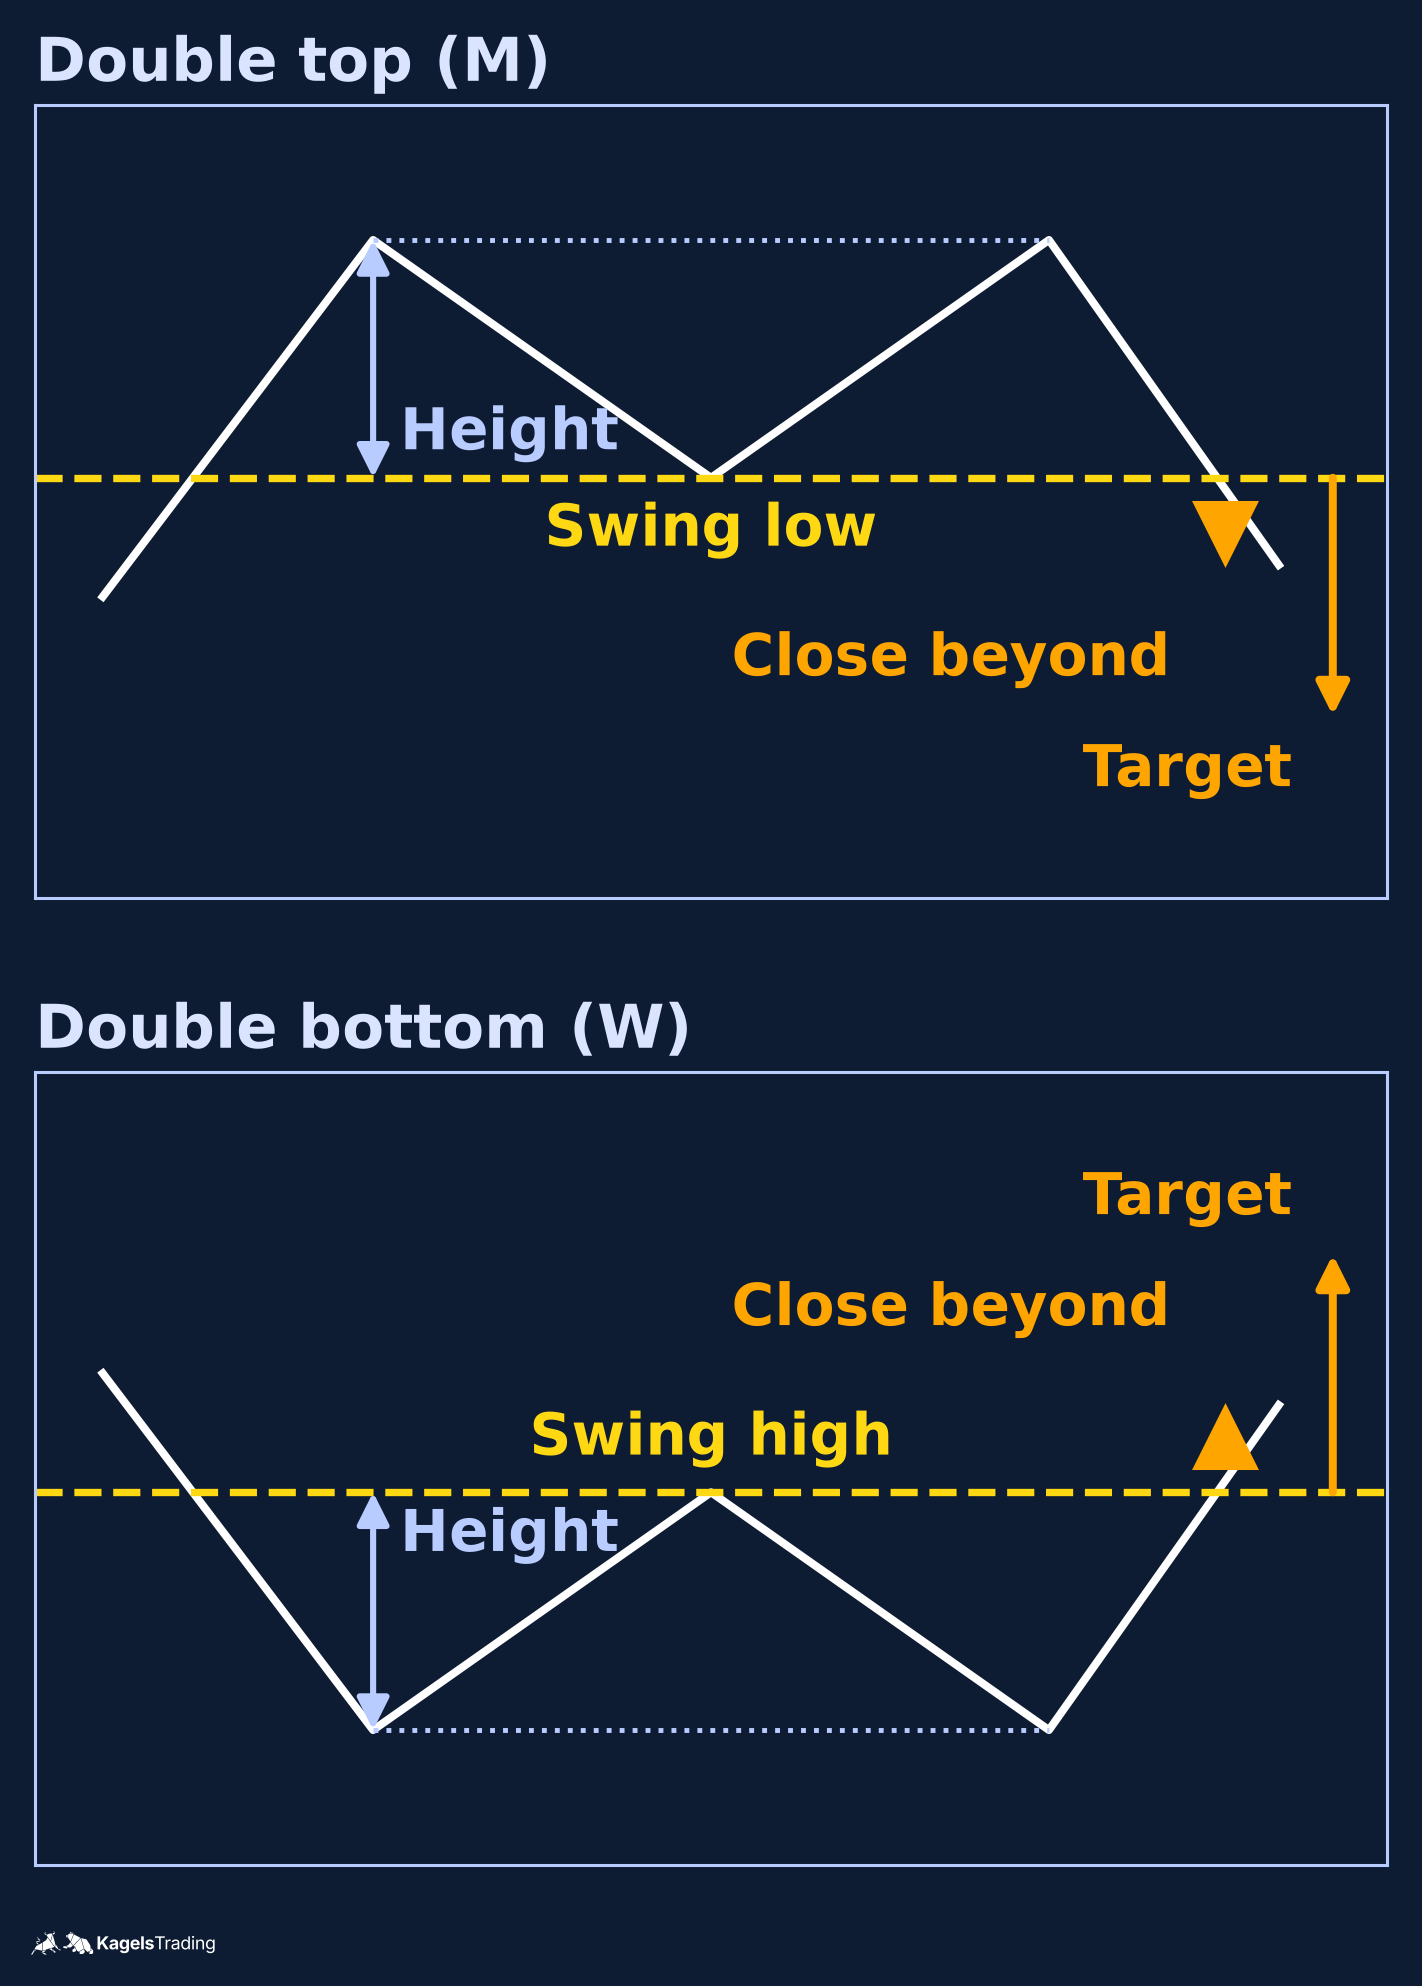
A double top is two swing highs at a similar level, with a swing low between them. A double bottom is the mirror: two swing lows at a similar level with an intervening swing high.
- Confirmation is a daily close below the intervening swing low (double top) or above the intervening swing high (double bottom).
- Measured move: the vertical distance between the pair of peaks (or the pair of troughs) and the intervening trough (or peak) between them, projected downward from the confirmation level for a double top, or upward for a double bottom. The two swings are at a similar level by definition, so the measurement runs between those swings and the point in between, not between the two swings themselves.
- A tolerance band around the first swing is reasonable; the two swings do not need to match exactly. The same touch tolerance idea as in the range trading guide works here.
Triple top and triple bottom
A triple top is three swing highs at a similar level, with two intervening lows. The triple bottom is the mirror. The confirmation level is the lower of the two intervening lows (triple top) or the higher of the two intervening highs (triple bottom). The measured move is the height from the peaks (or troughs) to that confirmation level.
Rounding top and bottom
A rounding bottom is a slow bowl shape at the end of a downtrend; a rounding top is the opposite at the end of an uptrend. The pattern takes weeks or months and has no sharp confirmation level. Many traders use the highest high of the bowl (bottom) or the lowest low of the bowl (top) as the confirmation line; the measured move is the depth of the bowl, projected from the confirmation.
Continuation patterns
Continuation patterns are shapes that often appear inside a trend. The caveat is that a pause is not a guarantee of resumption; a trend can also end at a continuation pattern that fails.
Rectangles
 Click to enlarge
Source: Kagels Trading, own drawing.
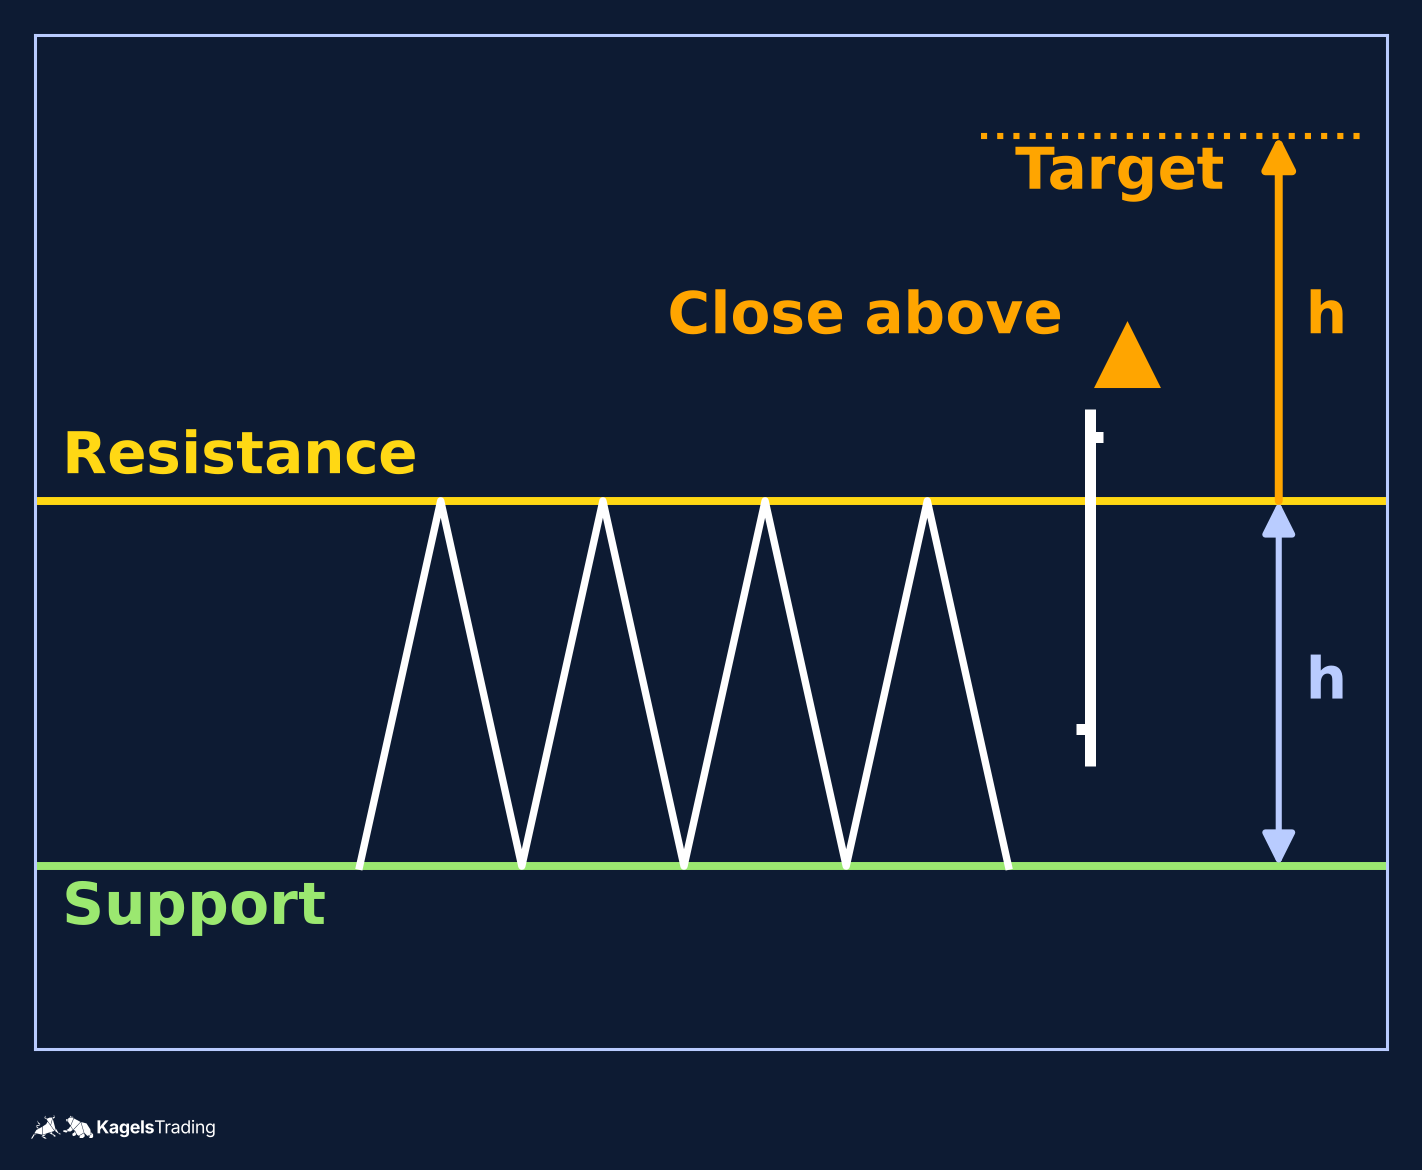
A rectangle is a horizontal range with a measured move. It is the same shape as a trading range: a flat top, a flat bottom, and several swings between them.
- Confirmation is a daily close beyond the horizontal boundary.
- Invalidation after confirmation is a daily close back inside the rectangle at any time during the stated holding window (this guide uses 10 trading sessions after entry, matching the worked SPY cases below).
- Measured move: the height of the rectangle, projected from the break in the direction of the break.
Triangles
 Click to enlarge
Source: Kagels Trading, own drawing.
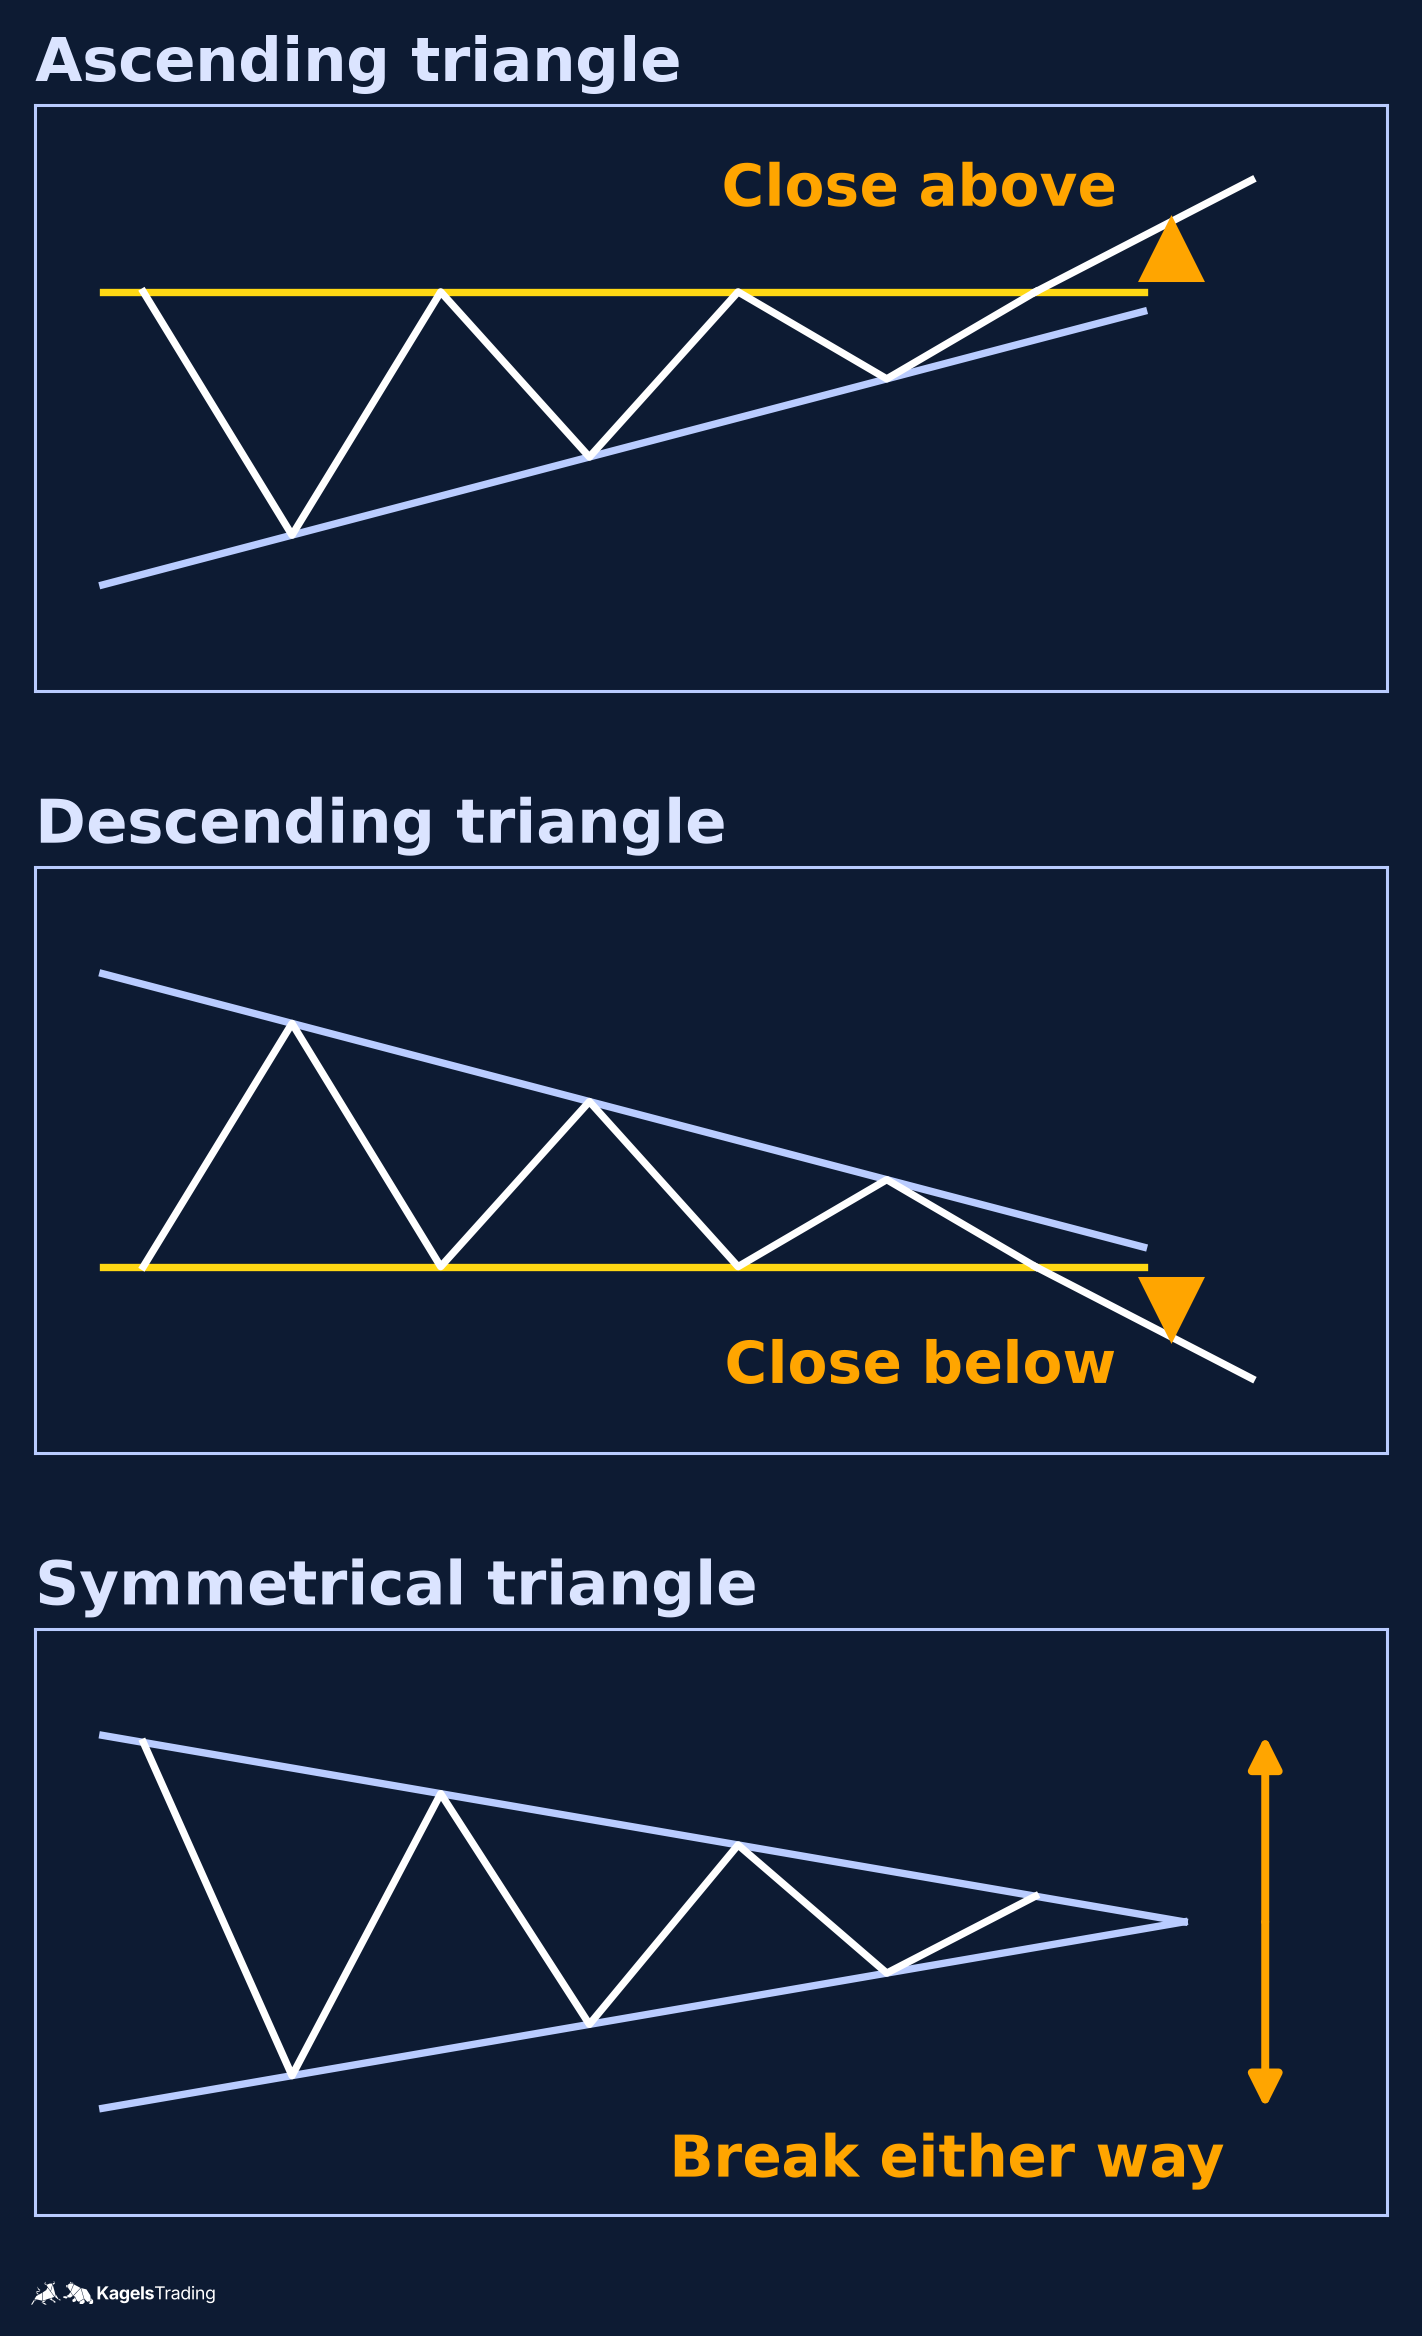
A triangle narrows a prior swing between two converging trendlines. Three variants are named: ascending, descending and symmetrical. The direction of the eventual break is not fixed by the shape alone and is read on the chart.
- Ascending triangle: a horizontal top line and a rising lower line. The common reading is a bullish continuation.
- Descending triangle: a horizontal bottom line and a falling upper line. The common reading is a bearish continuation.
- Symmetrical triangle: both lines converge. The direction is read on the chart.
Confirmation on triangles is a close beyond the near line, in the direction of the break. The near trendline is the one that price has approached last; the measured move is the width of the triangle at the start of the pattern, projected from the break. Trendline trading covers how to draw the two lines with a stated rule.
Flags and pennants
 Click to enlarge
Source: Kagels Trading, own drawing.
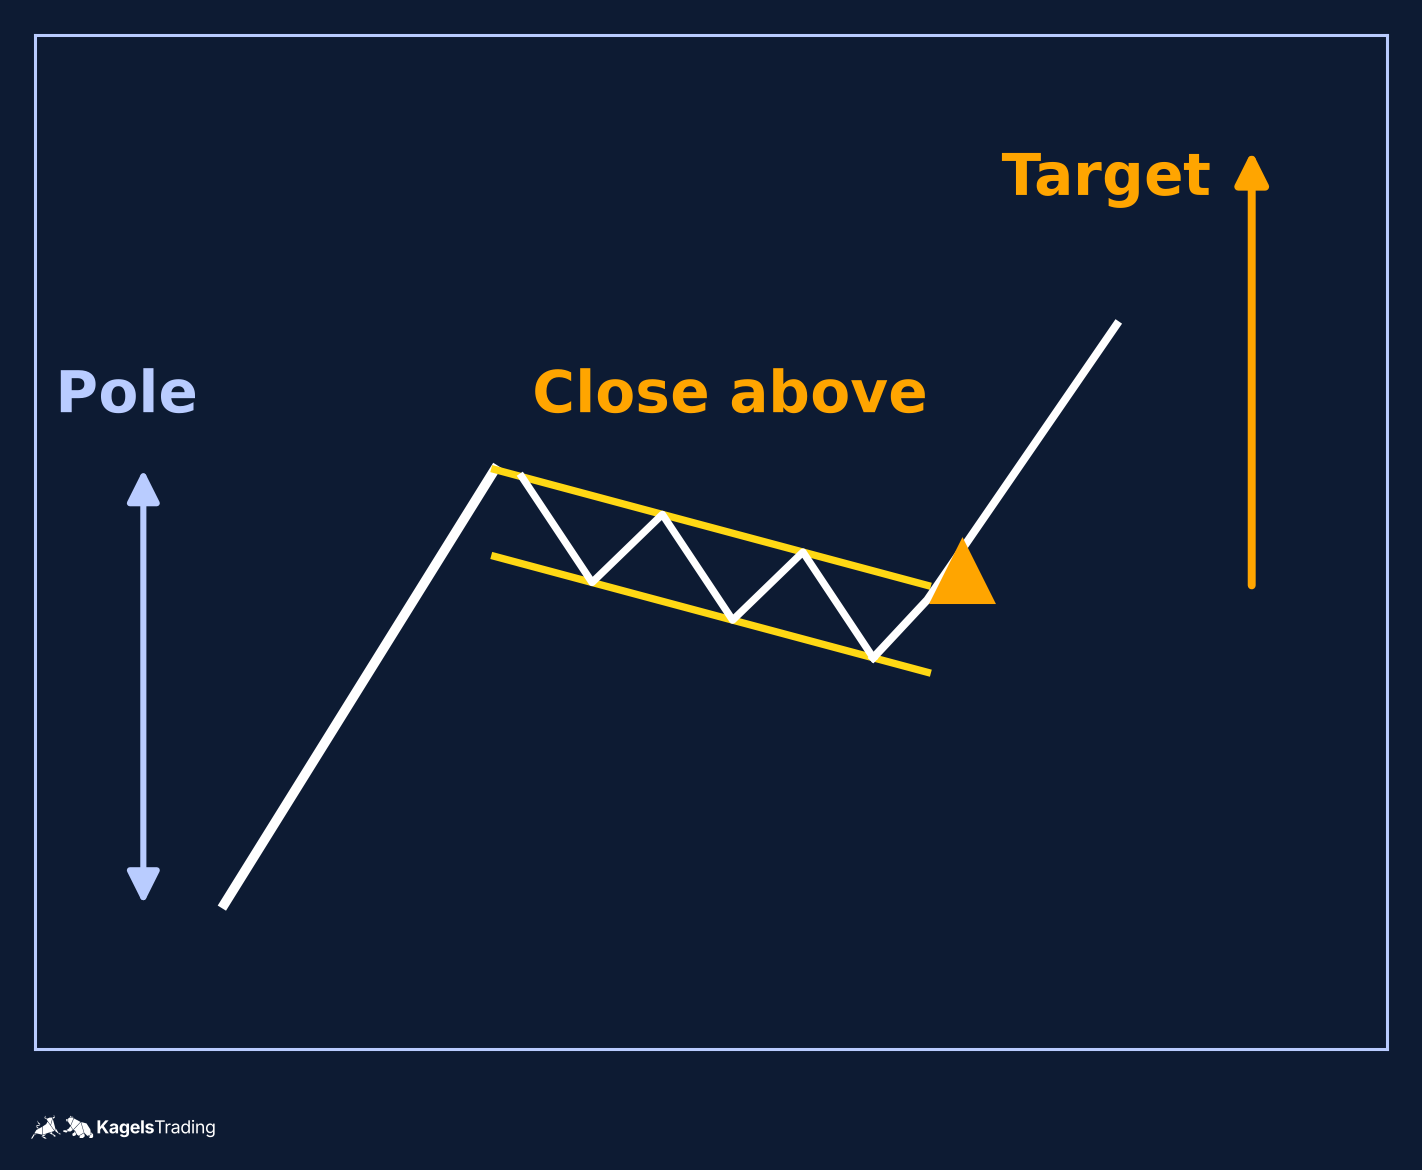
A flag is a short, shallow consolidation that slopes against a prior sharp move (the flagpole). A pennant is a flag whose two lines converge instead of staying parallel.
- Confirmation is a daily close beyond the flag channel (or the pennant’s near trendline) in the direction of the pole.
- Measured move: this guide uses one convention, the length of the flagpole, projected from the break. Other authors use shorter projections; stay with one convention per plan.
- Invalidation after confirmation is a close against the pole direction, inside the flag or beyond its opposite line.
Wedges
 Click to enlarge
Source: Kagels Trading, own drawing.
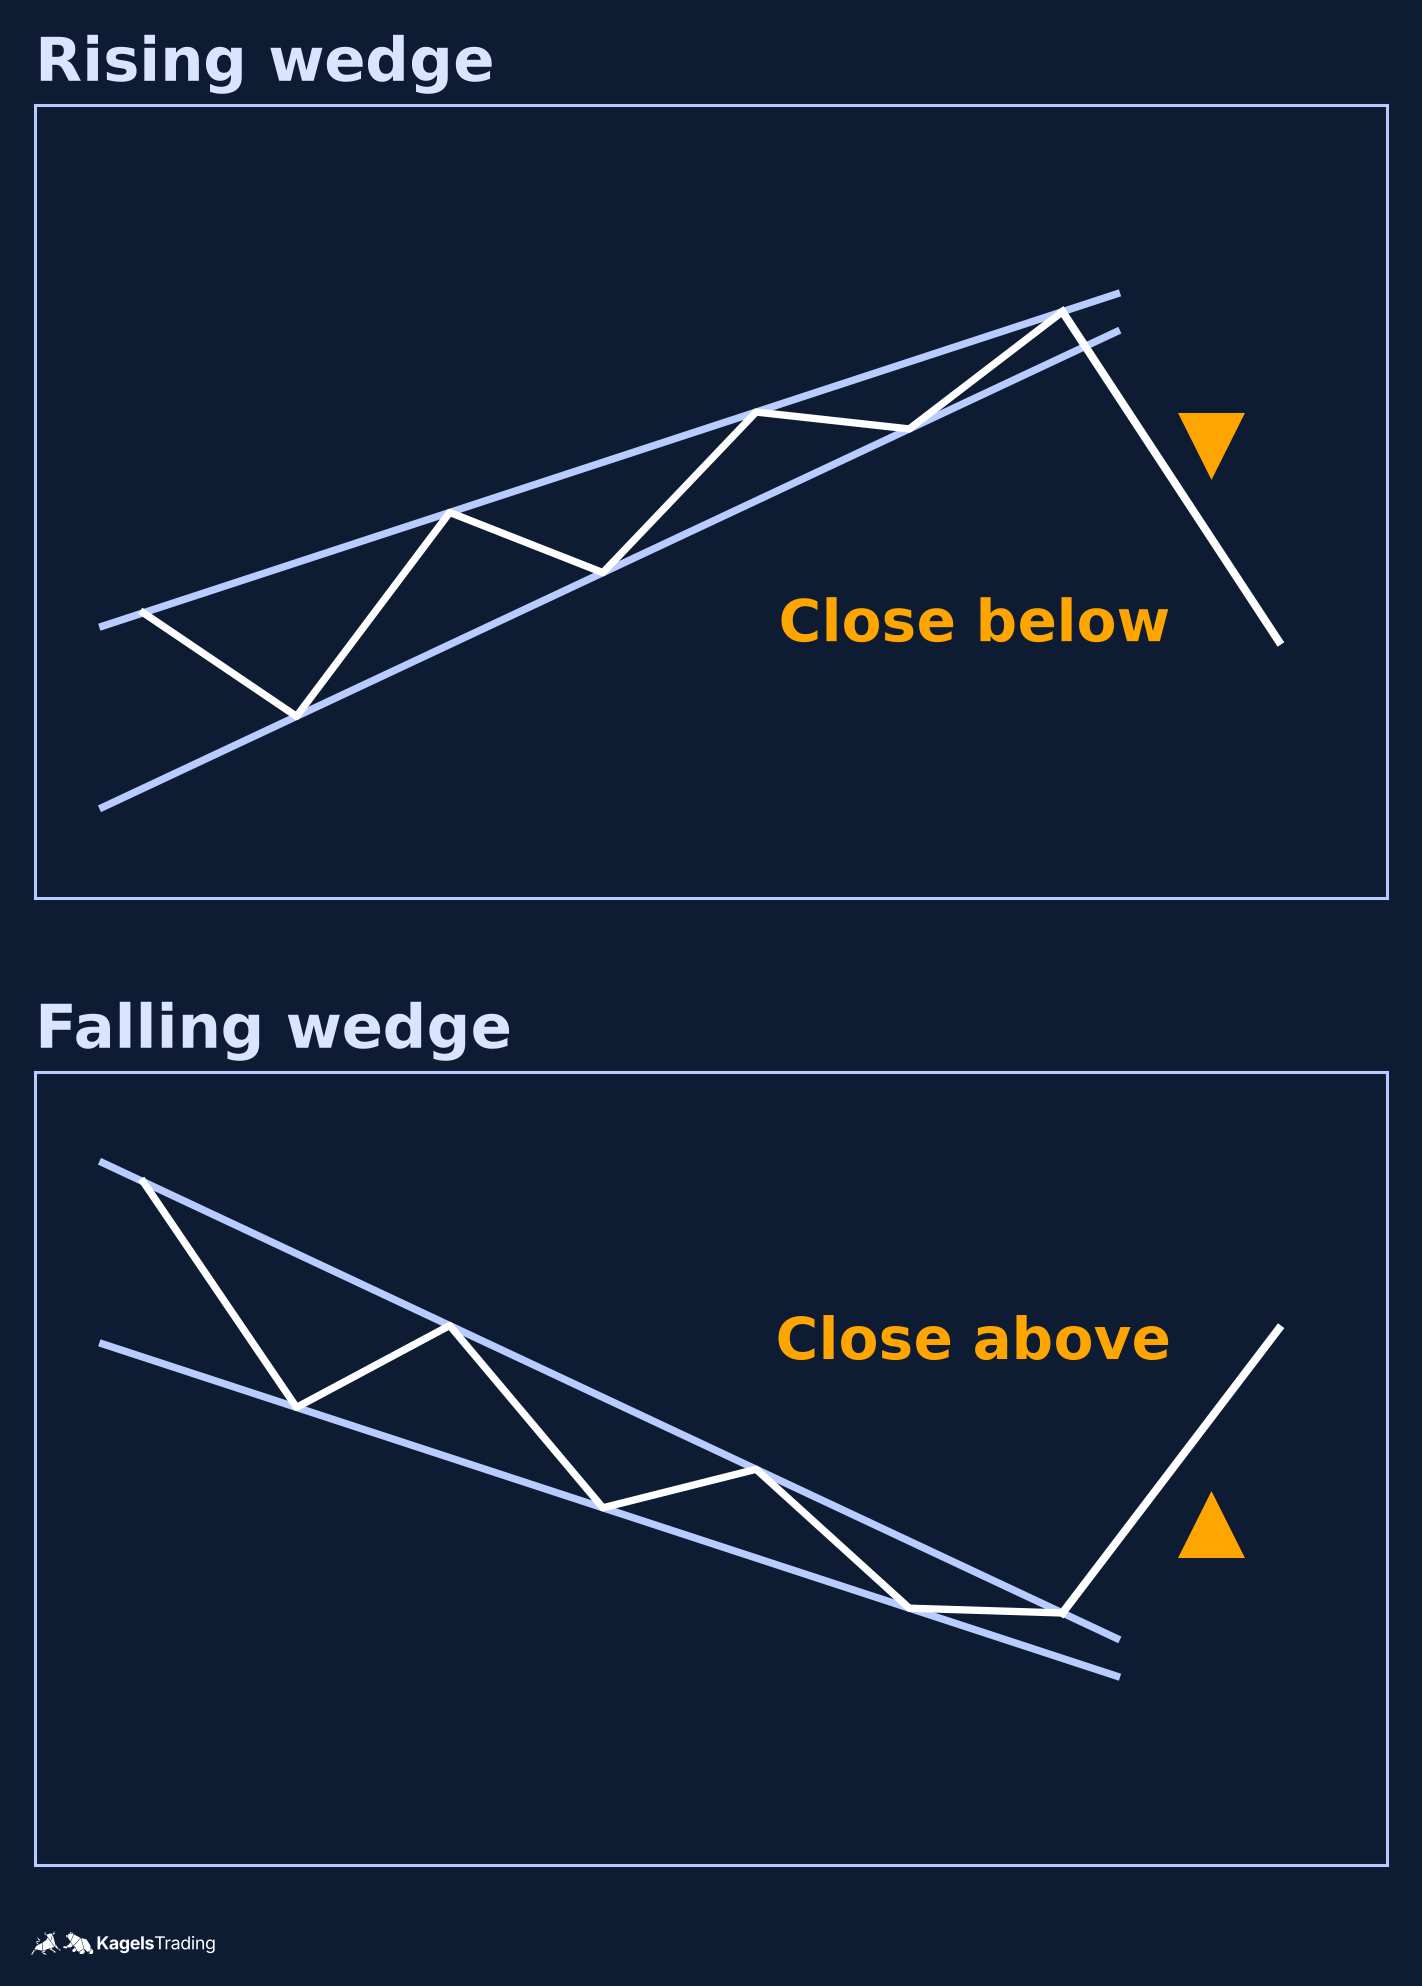
A rising wedge is two upward-sloping lines, with the lower line steeper, so the pattern narrows upward. A falling wedge is two downward-sloping lines, with the upper line steeper, so the pattern narrows downward. Both lines point the same way; what makes them a wedge is the convergence.
- The common reading is that a rising wedge is a bearish setup when the lower line breaks, and a falling wedge is a bullish setup when the upper line breaks. The reading is a convention; the actual direction is read on the chart.
- Confirmation is a daily close beyond the near line, against the convergence.
- Measured move: no single standard. This guide does not quote a measured-move convention for wedges; use discretion, or treat the wedge as a direction-only signal.
Cup and handle
 Click to enlarge
Source: Kagels Trading, own drawing.
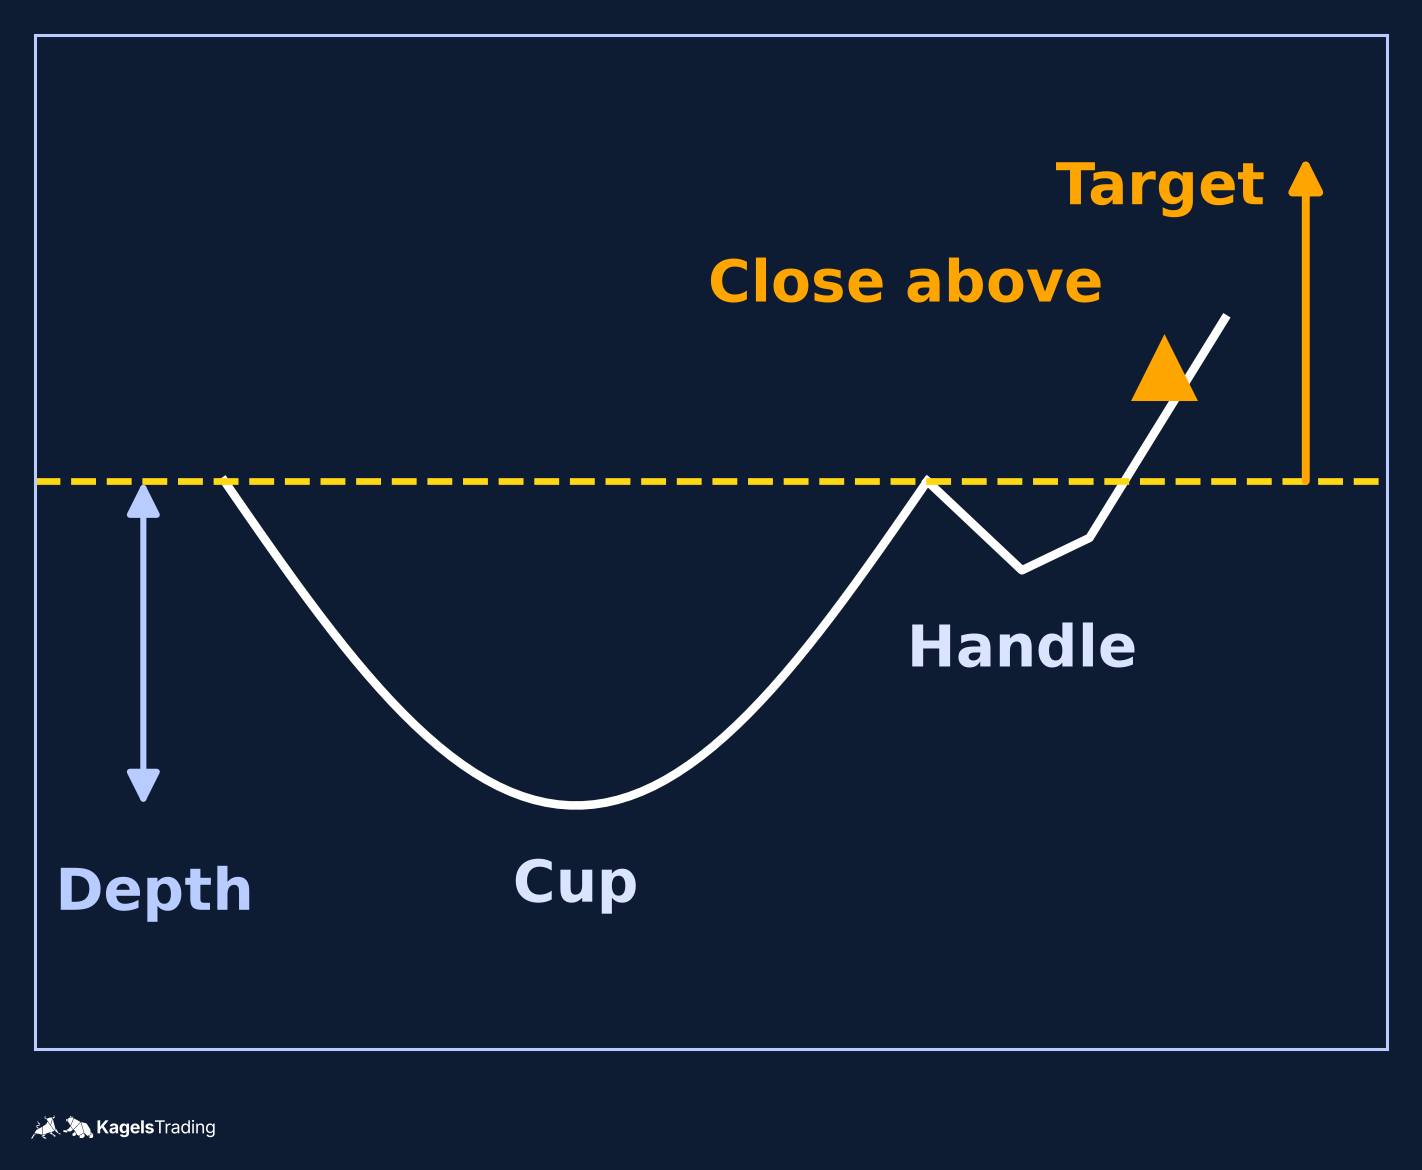
A cup and handle is a rounded bottom (the cup) followed by a shallow pullback (the handle) on the right side. The pattern often forms over weeks on daily charts of individual stocks; it is less common on broad index charts, where the handle tends to be noisier.
- Confirmation is a daily close above the handle’s high.
- Measured move: the depth of the cup, projected from the confirmation.
- A failure after confirmation is a close back below the handle’s low.
How to read a formation in practice
Reading a pattern is a sequence, not a snap decision. The order is the same for every formation; a missing step is a shortcut, not a trade.
- Draw the pattern with information then available. If the right shoulder is not finished, the pattern is not a pattern yet.
- Wait for the stated confirmation rule. Daily close, two-bar close: whichever the plan says, it says it before the trade.
- Plan the order and the stop. A breakout entry is a stop order through the confirmation level, or a market order at the next open after a daily close beyond the confirmation level; a pullback entry is a limit order at a retest. Pre-placed stops and close-based decisions are different alternatives, not interchangeable.
- Assess nearby obstacles. A measured move that passes through a prior swing high or a known supply zone is not a target; the obstacle is.
- Decide the exit before the trade. Trailing, break-even, scaling: one method per plan.
Projections are estimates, not promises. A measured move is a defensible target because it is defined before the trade; it is not a defensible target because the market has to go there.
Two SPY rectangle cases under one illustrative rule
Both cases use the same stated rule, applied to Yahoo Finance regular-session daily data. The window rule is the same as in the range trading guide: the last 14 trading sessions, both inclusive; the window’s maximum high is the top line and the minimum low is the bottom line; the window qualifies when at least two sessions touch the top line within 0.4 percent, at least two sessions touch the bottom line within 0.4 percent, the absolute least-squares slope of daily closes divided by the mid-price is at most 0.07 percent per session, and the width divided by the mid-price is between 2 and 4.5 percent. Boundaries are frozen at the end of the window.
- Entry alternative A (used here). A daily close above the top line is a confirmation close. Entry is a market order at the next US cash open after the confirmation close. This is a decision after the fact; it is not an order waiting in the book during the confirmation bar.
- Entry alternative B (not used here, named for contrast). A pre-placed buy stop at the top line plus a buffer. This fills intraday on a touch; the fill price is not guaranteed and can be worse than the stop in a fast market or at a gap.
- Confirmation window. Watch the next 10 trading sessions after the frozen 14-session window. Take the first daily close above the top only if no earlier close below the bottom occurred during this watch window. Closes inside the range before confirmation are allowed. After entry, a daily close back below the top line invalidates the trade, with an exit at the next US cash open.
- Target sell limit. For this long trade, a resting sell limit sits at the top line plus the window width, projected upward from the top boundary. The target fills on the first session whose high reaches or exceeds the limit, at or above the limit price.
- Protective sell stop. At the window’s bottom. A gap through the stop fills at the next available price; the stop cannot be assumed to fill at a specific price.
- Expiry. 10 trading sessions, counting the entry session as session 1. If no target hit and no close-based invalidation inside the window, the trade is closed at the open on the session after expiry.
- Same-session ambiguity. If the stop and the target are both touched inside one session, mark the trade ambiguous.
- Costs budget. A 0.06 per share illustrative round-trip allowance is used for the net result. It is a hypothetical modelling choice, not a verified broker quote; actual costs and slippage depend on the broker, the account type, the fill venue and the market at the time.
- Educational caveat. Both cases are retrospectively selected hypothetical illustrations of mechanics, not a backtest and not a personal recommendation.
Loss: 2020-12 to 2021-01
 Click to enlarge
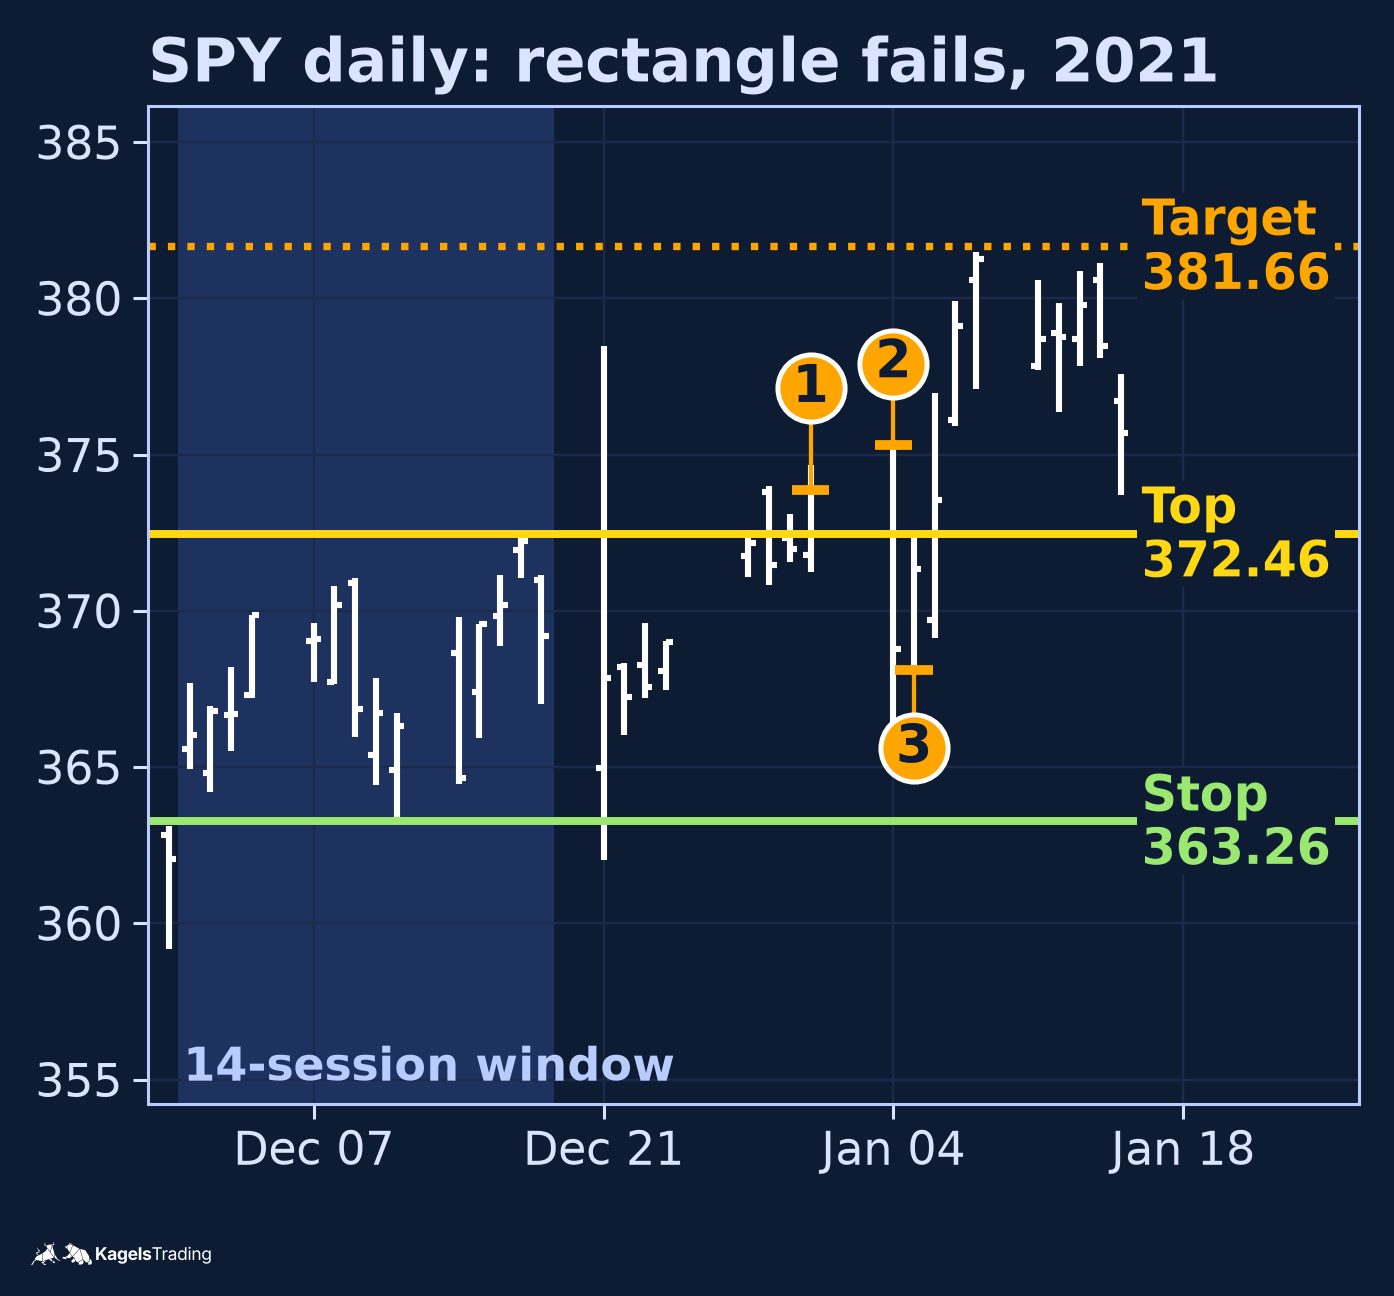
- 14-session window: 2020-12-01 to 2020-12-18. Top line = window high 372.46 on 2020-12-17. Bottom line = window low 363.26 on 2020-12-11. Width 9.20 points. Target = 372.46 plus 9.20 equals 381.66.
- First daily close above the top: 2020-12-31 at 373.88 (Yahoo Finance regular-session close). No prior daily close below 363.26 in the same window.
- Entry 2021-01-04 open 375.31.
- 2021-01-04 high 375.45 is below the target; low 364.82 is above the stop; daily close 368.79 is below the top line 372.46, which triggers the close-based invalidation.
- Exit 2021-01-05 open 368.10.
- Gross loss: 375.31 minus 368.10 equals 7.21 per share. Net loss: 7.27 per share after 0.06 illustrative round-trip allowance. The initial stop-distance risk at the protective stop was 375.31 minus 363.26 equals 12.05 per share, which is not a cap on the possible loss because gaps and fast markets can fill worse.
Win: 2021-03 to 2021-04
 Click to enlarge
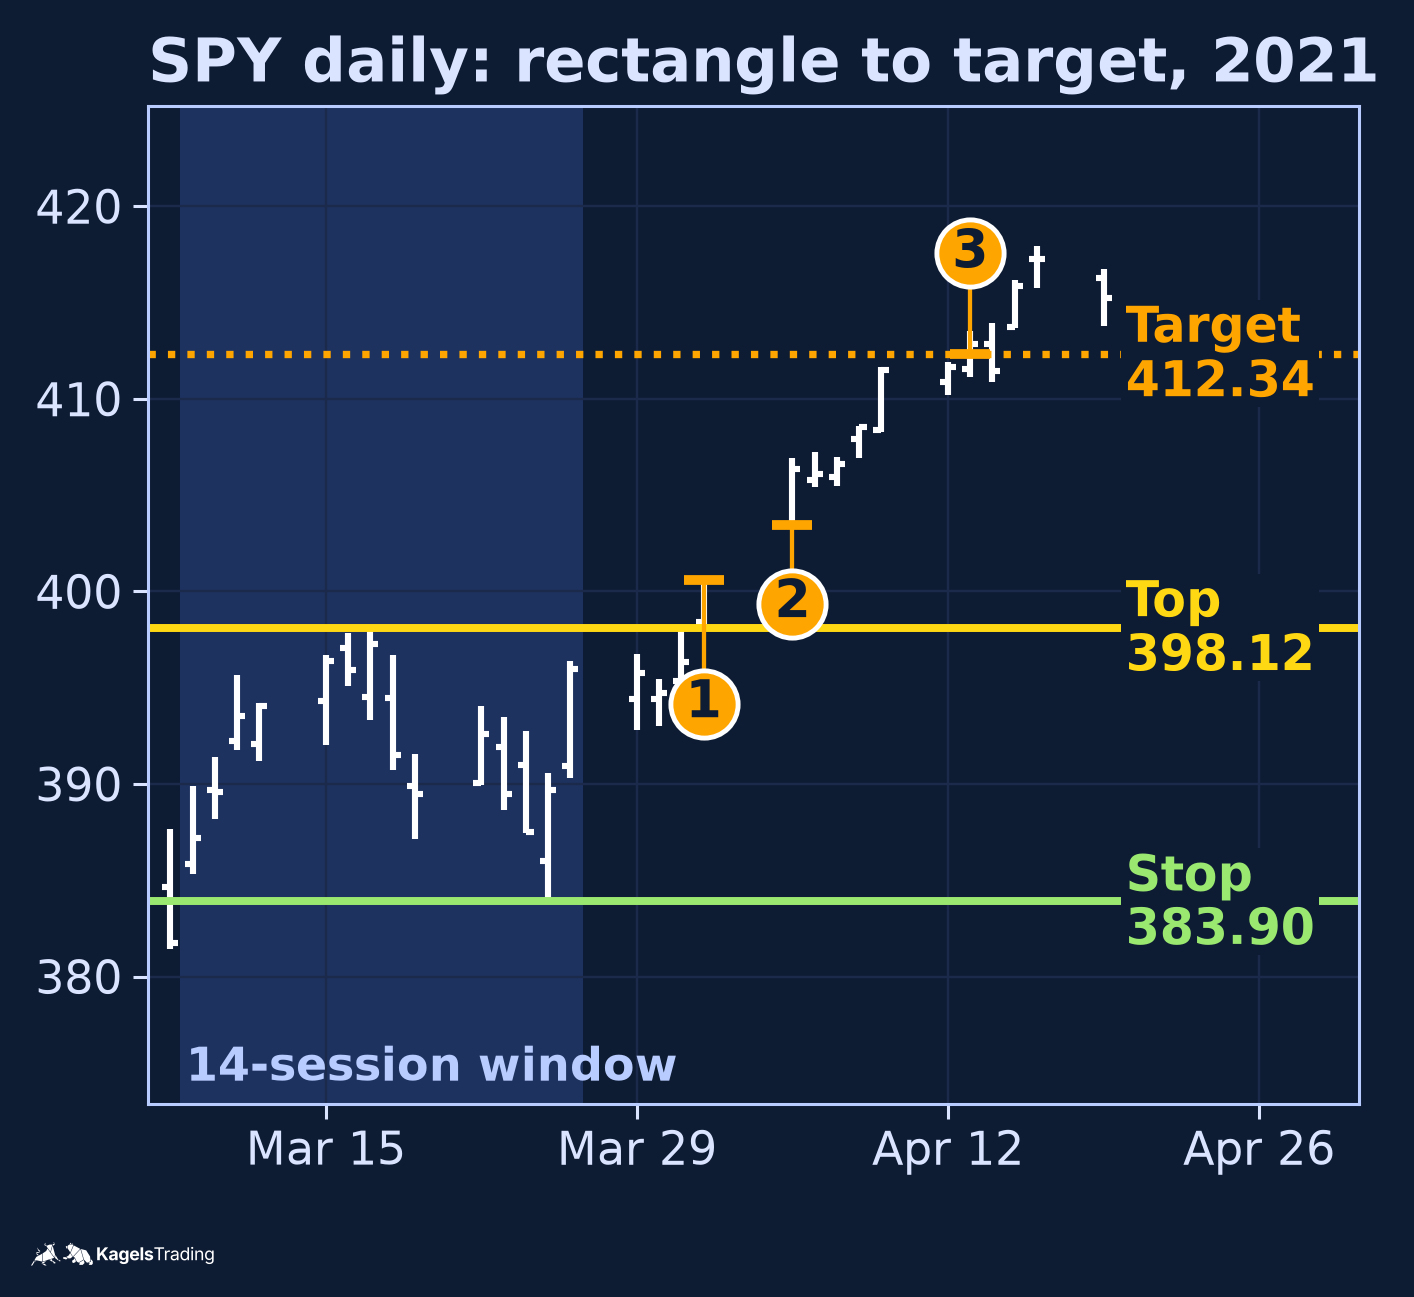
- 14-session window: 2021-03-09 to 2021-03-26. Top line = window high 398.12 on 2021-03-17. Bottom line = window low 383.90 on 2021-03-25 (Yahoo Finance regular-session low). Width 14.22 points. Target = 398.12 plus 14.22 equals 412.34.
- First daily close above the top: 2021-04-01 at 400.61. 2021-04-02 was Good Friday (markets closed). Entry 2021-04-05 open 403.46.
- No daily close back below 398.12 (the top line, which under the invalidation rule exits the long at the next open) and no touch of the 383.90 stop inside the next 10 sessions. 2021-04-12 daily high 411.93 (below the target). 2021-04-13 daily high 413.53 at or above the 412.34 target; the hypothetical target sell limit fills at 412.34.
- Gross reward: 412.34 minus 403.46 equals 8.88 per share. Net reward: 8.82 per share after 0.06 illustrative round-trip costs. The initial stop-distance risk was 403.46 minus 383.90 equals 19.56 per share.
Two cases, one won and one lost, under the same stated rule. This is a description of two cases, not a win rate. The breakout trading guide covers a related count of 1,472 daily closes beyond a 10-bar extremum, which is a related but different event; this guide does not quote it as a rectangle success rate.
Checklist and limits
- Pick one timeframe for the pattern and keep it. A daily pattern and a 1-hour pattern on the same chart are separate decisions, not one trade.
- Draw the pattern with information then available. A pattern on a historical chart is easier than a pattern on the right edge of a live chart.
- State the confirmation rule. Daily close, specified distance, two-bar close: one rule per pattern.
- State the invalidation. The price at which the pattern is wrong, before the trade.
- The measured move is a convention. Each pattern has one; keep the same convention across trades.
- Reversal, continuation and bilateral are labels for the plan. A failed reversal does not have to resolve into a continuation; a failed continuation does not have to reverse. The chart decides.
- Protective broker-side stop and close-based invalidation are different orders. State both before the trade.
- Same-session ambiguity. If the stop and the target are both hit in one session, mark the trade ambiguous.
- Volume rules are soft signals. A low-volume break can still work; a high-volume break can still fail.
- Avoid best-pattern rankings. Any “most reliable chart pattern” claim without a reproducible method, a sample and a cost assumption is marketing.
Frequently asked questions about chart patterns
Which timeframe works best for chart patterns?
The timeframe matches the holding period, not the pattern. A rectangle on a 5-minute SPY chart is a different trade from one on a daily SPY chart, with different costs. The multi-timeframe analysis guide covers how to pick the base.
Which chart patterns are bullish and which are bearish?
The chart decides, not the name. By convention, an ascending triangle, a double bottom, a bullish flag, a falling wedge, a cup and handle and an inverse head and shoulders are bullish setups; their mirrors are bearish. The pattern becomes bullish or bearish when a close confirms it, not before.
What is the most reliable chart pattern?
There is no honest short answer. Reliability depends on the market, the timeframe, the costs, the exit rule and the sample size. Any claim of a general success rate for one named pattern needs a method, data and an out-of-sample test.
Do chart patterns work in forex and crypto?
They draw the same shapes. Whether they work in the same way is a question for a backtest, not for an opinion: cost structures, session effects, 24-hour trading and, in forex, the lack of a single centralised exchange-wide daily close across venues each change the result.
Can software recognise chart patterns automatically?
Yes, software can detect several named patterns, with limits. Several platforms detect head and shoulders, triangles, flags and double tops. The judgement about nearby obstacles, timing and trend context is not inside the detection rule. Treat an auto-detected pattern as a candidate, not as a signal.
What should I do when a chart pattern fails?
Take the invalidation and move on. The invalidation is the price in the plan, not a feeling at the chart. The next trade is a new pattern, with its own written rules.
Sources we checked for pattern conventions
- CME Group education, Trend and continuation patterns: used for the rectangle, triangle and flag definitions.
- CME Group education, Technical patterns reversals: used for the head and shoulders and double / triple top-bottom confirmation descriptions.
- Bulkowski (2012), Wiley chapter 11 summary page: used for the flag versus pennant distinction (parallel lines versus converging) and the prior-flagpole requirement.
Further reading, not used as sources here
- Thomas N. Bulkowski, Encyclopedia of Chart Patterns (second edition, 2005).
- Robert D. Edwards and John Magee, Technical Analysis of Stock Trends (first published 1948).
More Chart Techniques guides
- Draw key levels
Support and Resistance: How to Draw and Use Key Levels
Where useful levels come from, how to draw zones with a stated rule and how to turn a level into a trade plan.
- Read price action
Price Action Trading: How to Read Charts Without Indicators
Market structure, key zones and three bar patterns, with a core setup and a real SPY example where the signal failed.
- Read candlestick charts
How to Read Candlestick Charts: Body, Wicks and Context
Open, high, low and close in one candle, body and wicks, two real Gold candles read step by step and how often patterns really occur.
- Know candlestick patterns
Candlestick Patterns: 10 to Know, Tested on Real Data
Ten patterns with rules and a cheat sheet, counted on DAX, S&P 500, EUR/USD and Gold since 2014: most are rare, none is a signal on its own.
- Combine timeframes
Multi-Timeframe Analysis: A Weekly and Daily Workflow
How to combine the weekly chart for context and the daily chart for entry under one stated rule, with a documented SPY case from June 2025.
- Trade sideways ranges
Range Trading: Boundaries, Orders and Two Documented Fades
A 14-session rule to draw horizontal boundaries, three order-type variants and two Alpaca-verified SPY fades, one that reached the target and one that was stopped out.
- Trade breakouts
Breakout Trading Strategy: Entries and False Breakouts
How often breakouts fell back into the range in our count of 1,472, and how to plan entry, stop and position size.
- Draw and trade trendlines
Trendline Trading: How to Draw Trendlines and Trade Them
How to draw trendlines with a fixed rule, four strategies for bounces, breaks and retests, and a real SPY line break without a lasting reversal.
- Use Fibonacci levels
Fibonacci Retracement Levels: How to Draw and Trade Them
How to calculate and draw retracement levels, trade pullbacks with confluence and a stop at the structure, and what a ten-year test says about the levels.
- Set Fibonacci targets
Fibonacci Extension: Levels, How to Draw It and Calculator
Three-point extension targets from the end of a pullback, why they differ from levels beyond 100%, a free calculator and three SPY swings, one without a single target reached.
- Trade gaps
Gap Trading Strategy: How to Trade Gaps and When Gaps Fill
Opening and full gaps, the four classic gap types, how often SPY gaps filled in our count since 2001, and plans for gap fill and gap and go.
- Calculate pivot points
Pivot Points: Formulas, Types and How to Trade Them
Formulas for standard, Fibonacci, Woodie, Camarilla and DeMark pivots, a free calculator, which session counts and a real SPY day.
- Swing trade
Swing Trading: 4 Strategies, Risk and Real Examples
Four swing trading strategies on the daily chart, position size, gap risk and US rules, with two hypothetical SPY pullbacks: one hit its target, one was stopped out.
- Identify market stages
Stage Analysis: Stan Weinstein's Four Market Stages
Stan Weinstein's four stages on the weekly chart, a Stage 2 checklist and two TSMC breakouts: one ran for a year, one gapped through its stop.
- Read Wyckoff ranges
Wyckoff Method: Accumulation, Distribution and Springs
Accumulation and distribution with phases A to E, springs and upthrusts as optional tests, and two real TSMC ranges read with and without hindsight.
- Trade Darvas boxes
Darvas Box Strategy: Rules, Entries and Stop Losses
The box rules step by step, when the edges become known, where the stop goes, and a mechanical test on TSMC in 2024 with two honest results.
- Count Elliott waves
Elliott Wave Theory: Rules, Patterns and Fibonacci
The five-wave pattern, three hard rules, zigzags, flats and triangles, Fibonacci ratios and a real DAX count, from the first German translator of the standard work.
- Trade order blocks
Order Blocks: How to Spot, Draw and Trade the Zone
The three conditions behind a valid order block, entry and stop at the zone, two SPY cases from 2026 and a 25-year count where a fixed rule lost money.
- Trade fair value gaps
Fair Value Gap (FVG): How to Spot, Trade and Test It
The three-candle rule, bullish, bearish and inverse FVG, two SPY cases from 2026 and a 25-year count of how often gaps were revisited and traded.
- Read liquidity sweeps
Liquidity Sweep: How to Spot It and Trade the Reversal
Sweep or run, buy-side and sell-side liquidity, internal and external targets, SPY reversal, continuation and failed-reversal examples and a 25-year count of a fixed sweep rule.
- Interpret volume
Volume Analysis in Trading: How to Read Volume Honestly
What volume counts in stocks, futures, forex and crypto, how to read it against its own average, and our SPY test of high-volume days since 2001.